

How To Superimpose Pictures On Iphone Free
Superimpose X is a powerful iPhone photo editing and photoshop app. But it's also quite complex. In this step-by-step tutorial, you'll learn how to use Superimpose X to get creative with your editing. And you'll discover how easy it is to replace backgrounds or create beautiful double-exposures. Read on to start using the Superimpose app to produce stunning iPhone photo edits.
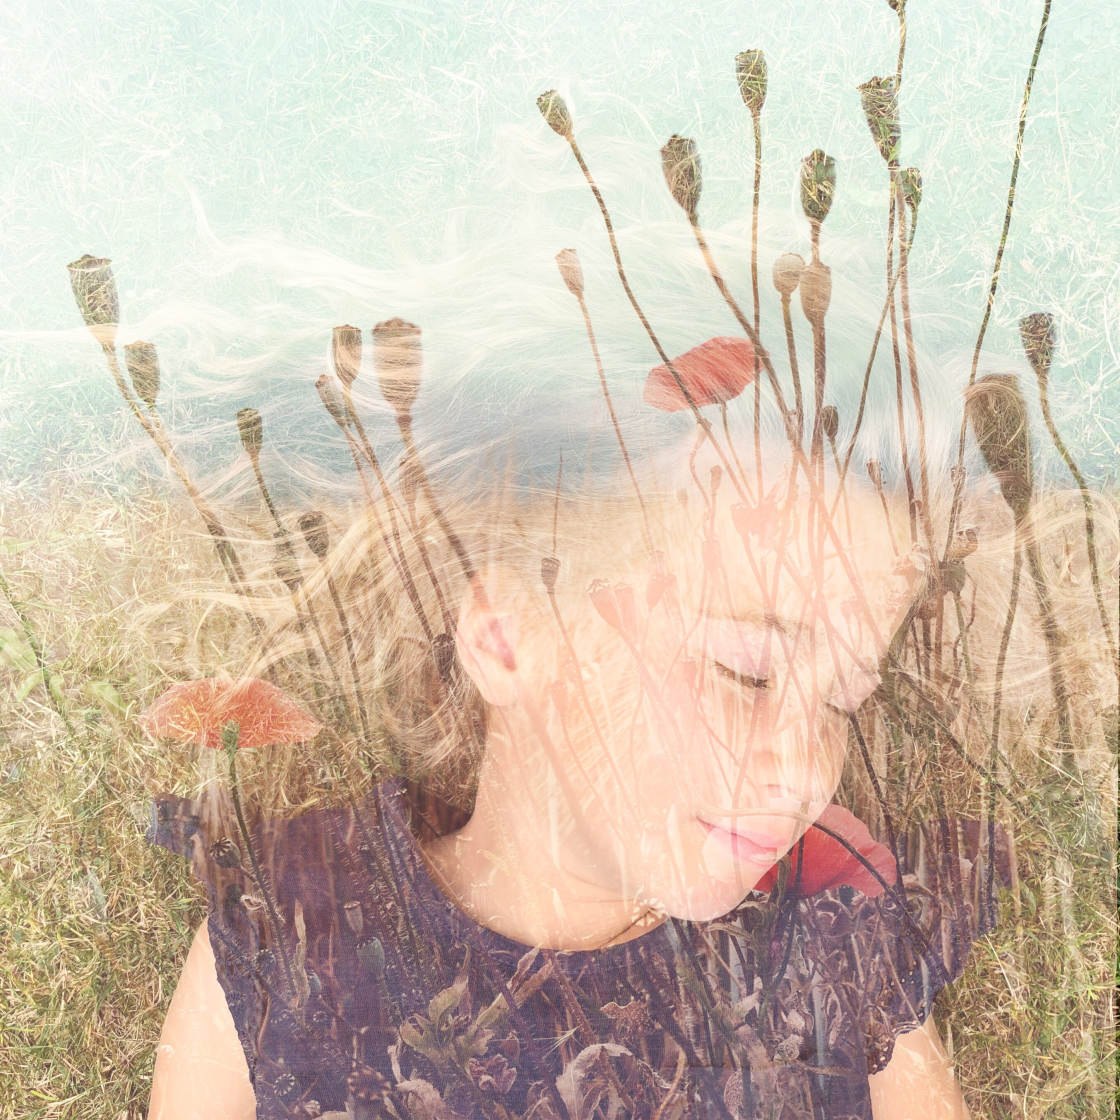
Table Of Contents: How To Use Superimpose X App
Click any title link below to go straight to that section of the tutorial:
Section1: Superimpose X Tools & Interface
1.1. Open An Image In Superimpose X
1.2 Navigate The Superimpose X Screen
Section 2: Use Mask Tools To Erase Parts Of An Image
2.1 Open The Mask Tools
2.2 Use The Magic Wand To Remove Large Areas Of Color
2.3 Use The Smart Brush For Accurate Edge Selection
2.4 Use The Brush For Precise Detail
2.5 Tips For Using Mask Tools
2.6 Save Your Cutout To The Mask Library
Section 3: Replace The Background Using Masks & Layers
3.1 Open Your Background Image
3.2 Add Your Second Image On A New Layer
3.3 Erase Areas Using Mask Tools
3.4 Add A Shadow
Section 4: Save Your Blended Image
Section 5: Create A Double-Exposure Image
5.1 Open Your Two Images
5.2 Blend The Layers
5.3 Use Mask Tools To Erase
5.4 Match The Colors Of Your Images
Section 6: Enhance Your Image With Filters & Editing Tools
6.1 Open The Filter & Editor Tools
6.2 Use The Brush To Paint Overlays Onto Your Image
Section 7: Manage Your Stored Sessions & Masks
1. Superimpose X Tools & Interface
If you're new to Superimpose X, it's a good idea to familiarize yourself with the app's layout and icons before you start editing. In this section, you'll explore the user interface and tools of the Superimpose X app.
Note that Superimpose X is the new and improved version of the popular Superimpose app. Both versions of the app are currently available in the App Store.
This tutorial covers how to use the newer Superimpose X app. You can download Superimpose X from the App Store for $4.99.
1.1 Open An Image In Superimpose X
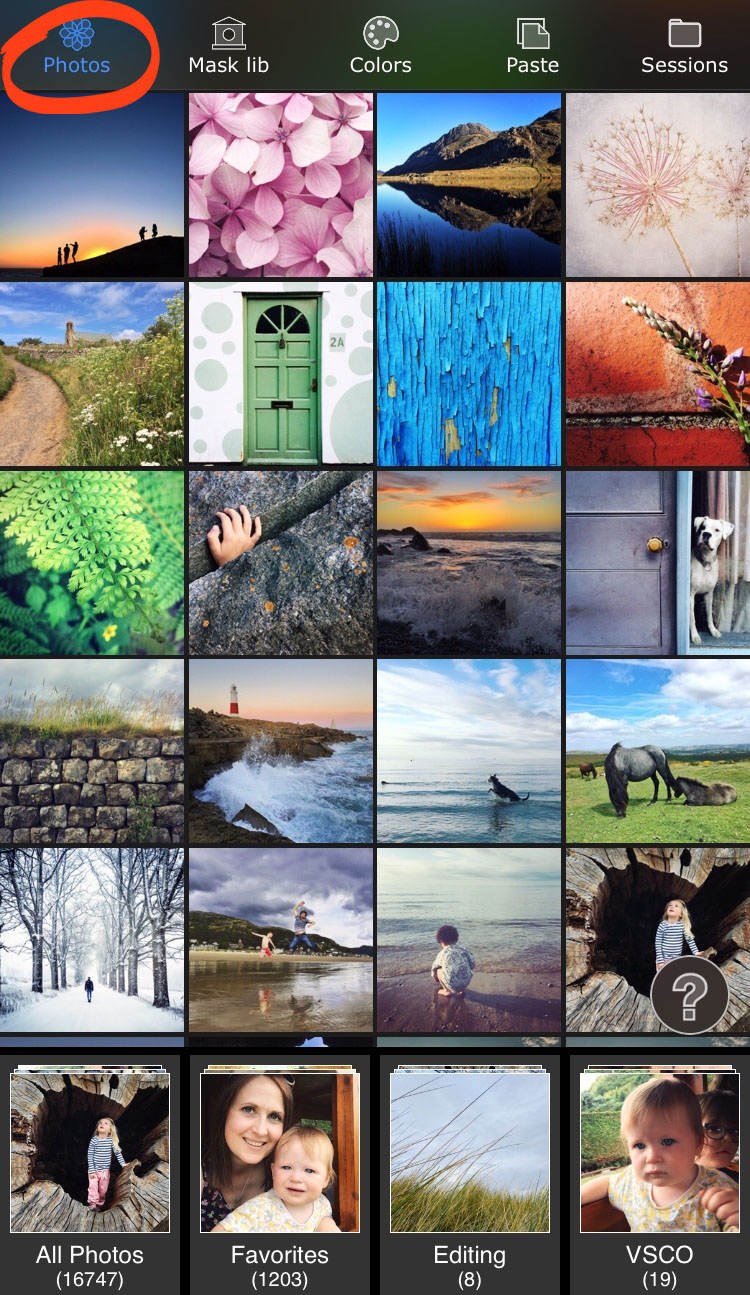
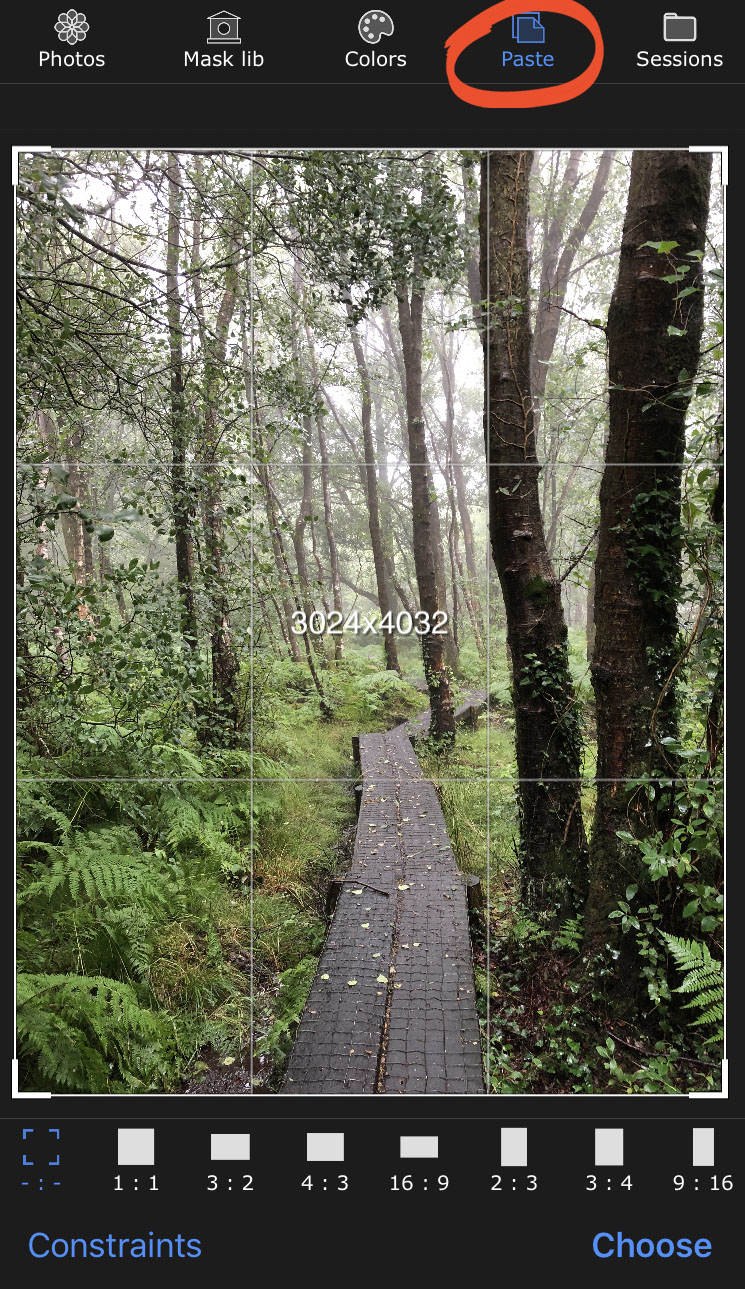
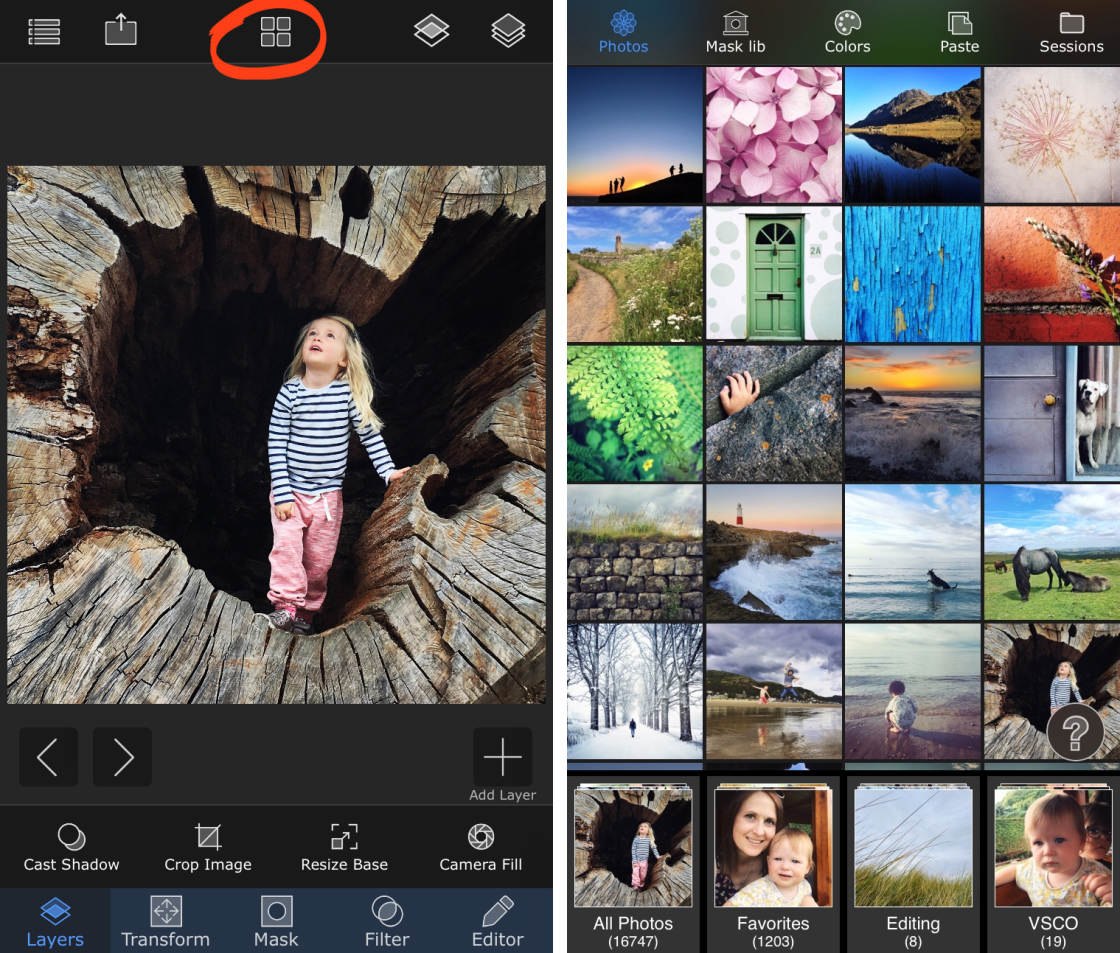
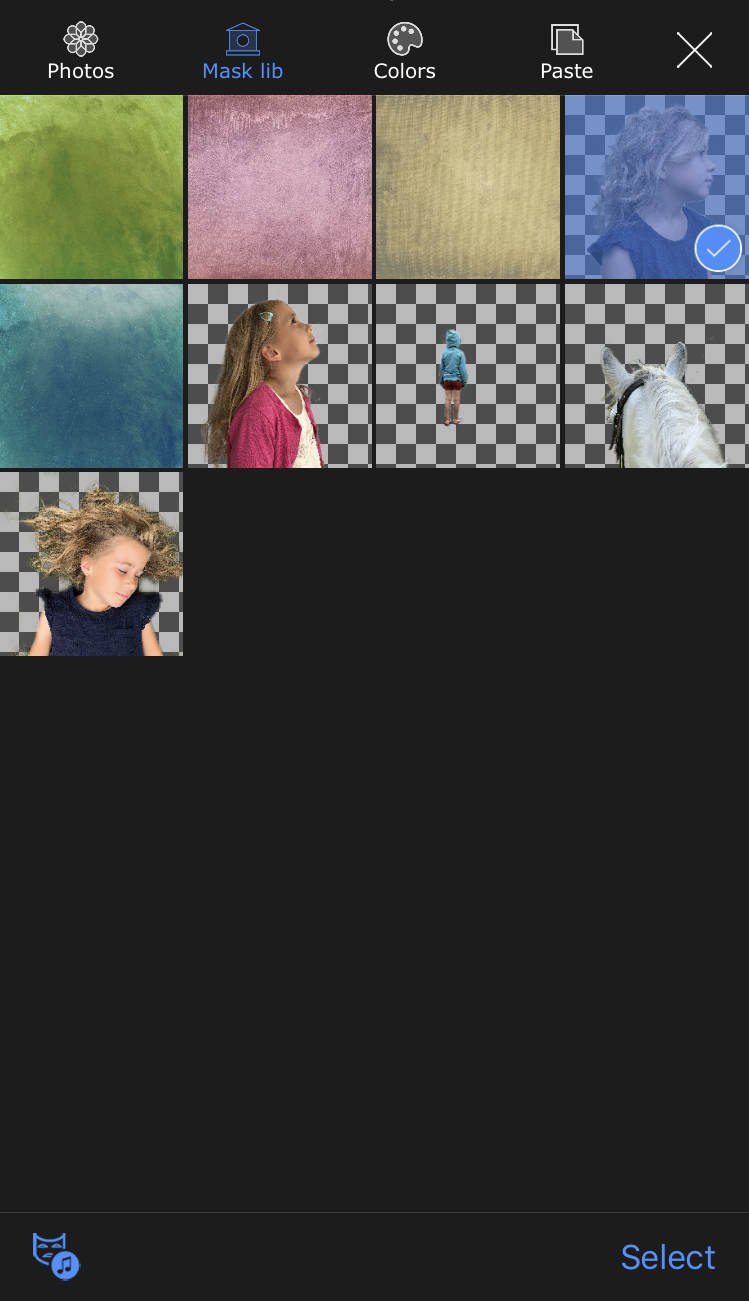
When you open the Superimpose X app, you'll see five icons at the top of the screen: Photos, Mask Lib, Colors, Paste and Sessions.
Each of these icons opens up a different tab where you can select an image to work on. Below is a short description of each icon.
The Photos tab displays your iPhone photo library. These are the images stored in your iPhone's built-in Photos app. Select an album from the bottom of the screen, and tap an image to open it.
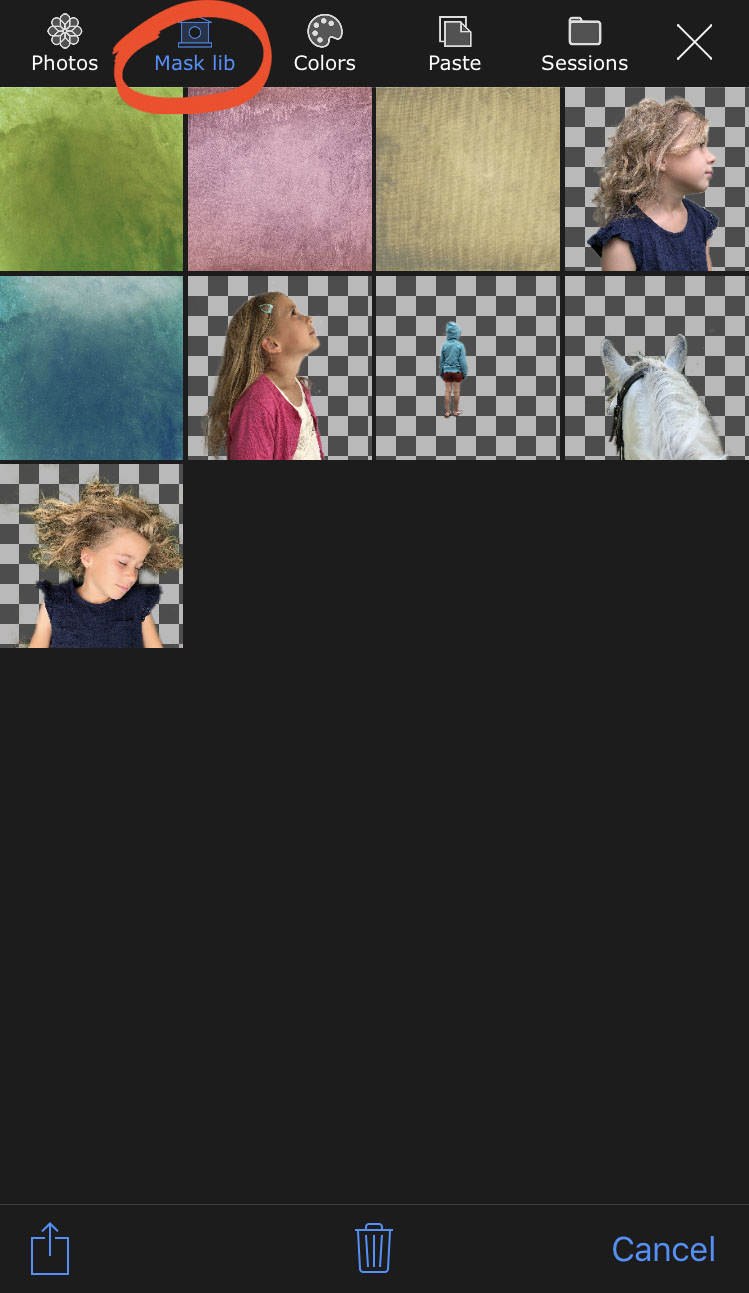
The Mask Lib (mask library) is where your saved masks get stored. When you cut out part of an image, you can save it as a mask. You can then add that mask to another photo at any time. When you learn how to save masks in section 2 of this tutorial, you'll see them in your mask library.
The Colors tab lets you create your own colored backgrounds. Choose a single color, or combine two colors blended with a gradient. You can then add one or more images onto the colored background.

The Paste tab is where you'll find an image that you've copied from another app on your iPhone. For example, you could copy an image from an email, document or webpage. To copy a photo, tap and hold on it for a couple of seconds, then select Copy.
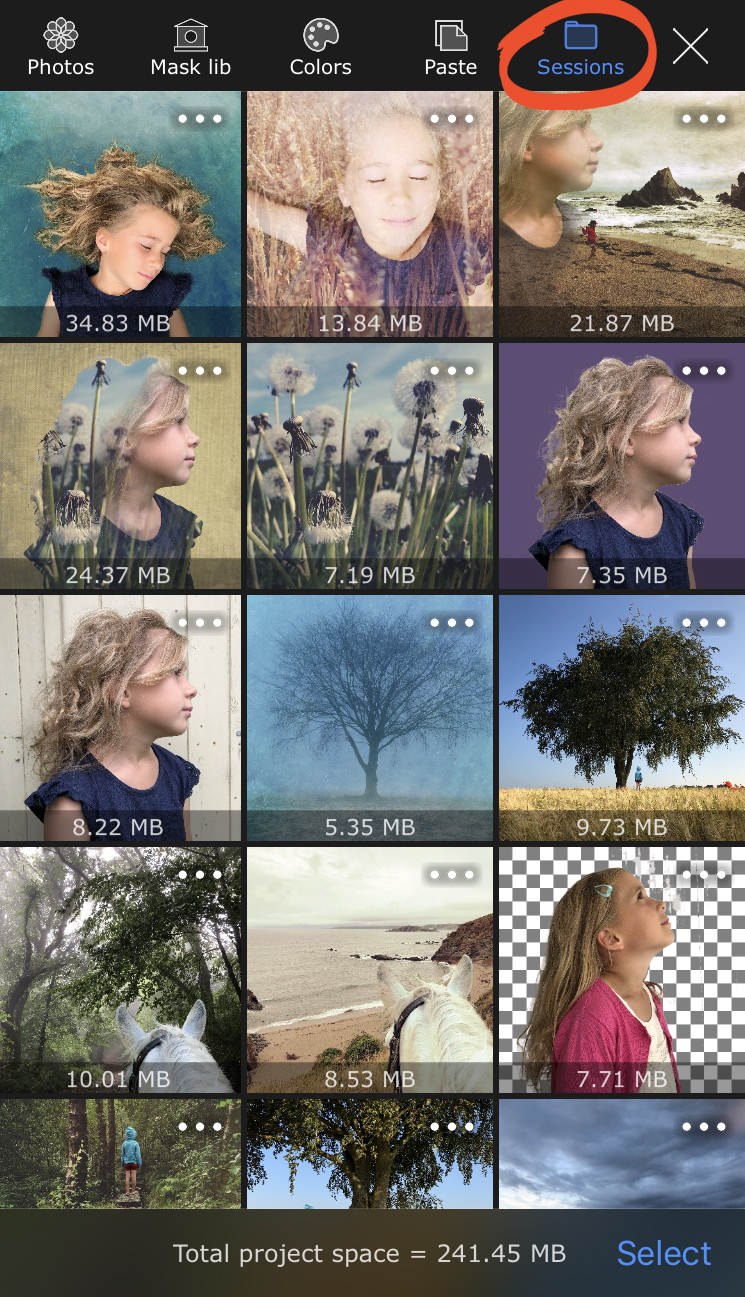
The Sessions tab stores any projects that you've previously worked on in Superimpose. As you create new projects during this tutorial, you'll see them appear here.
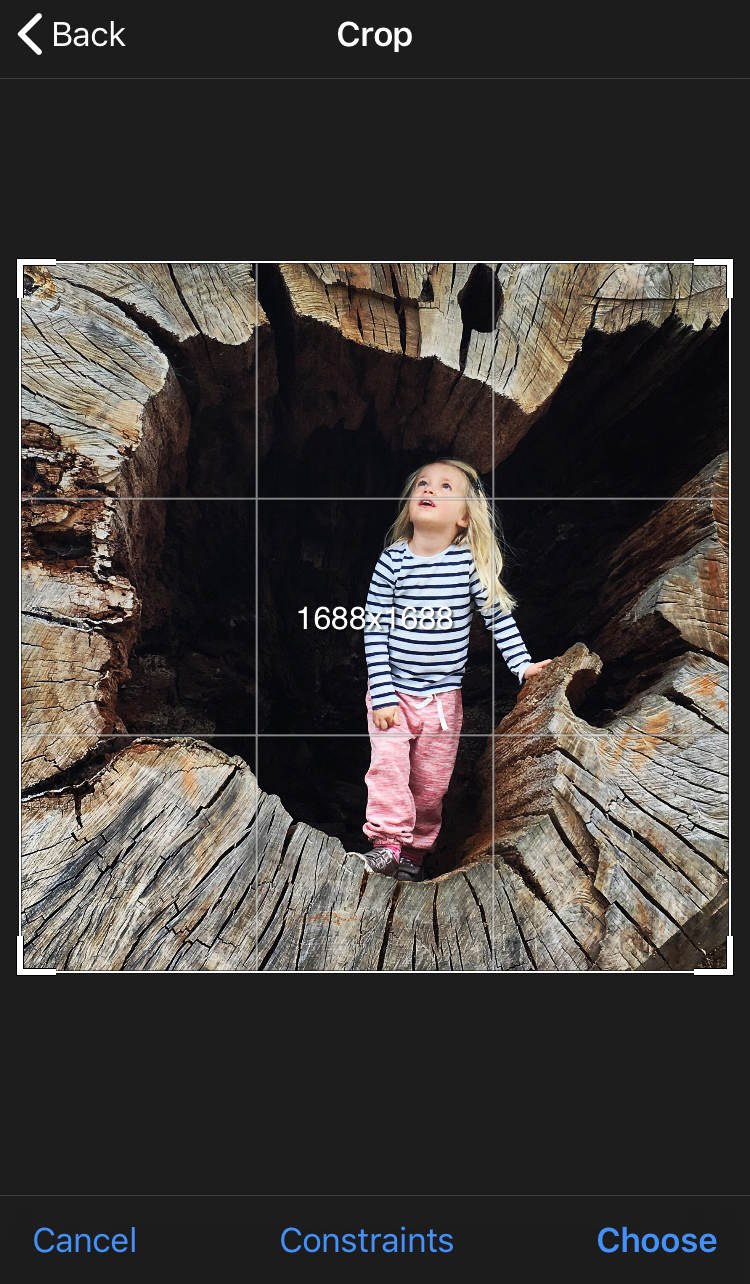
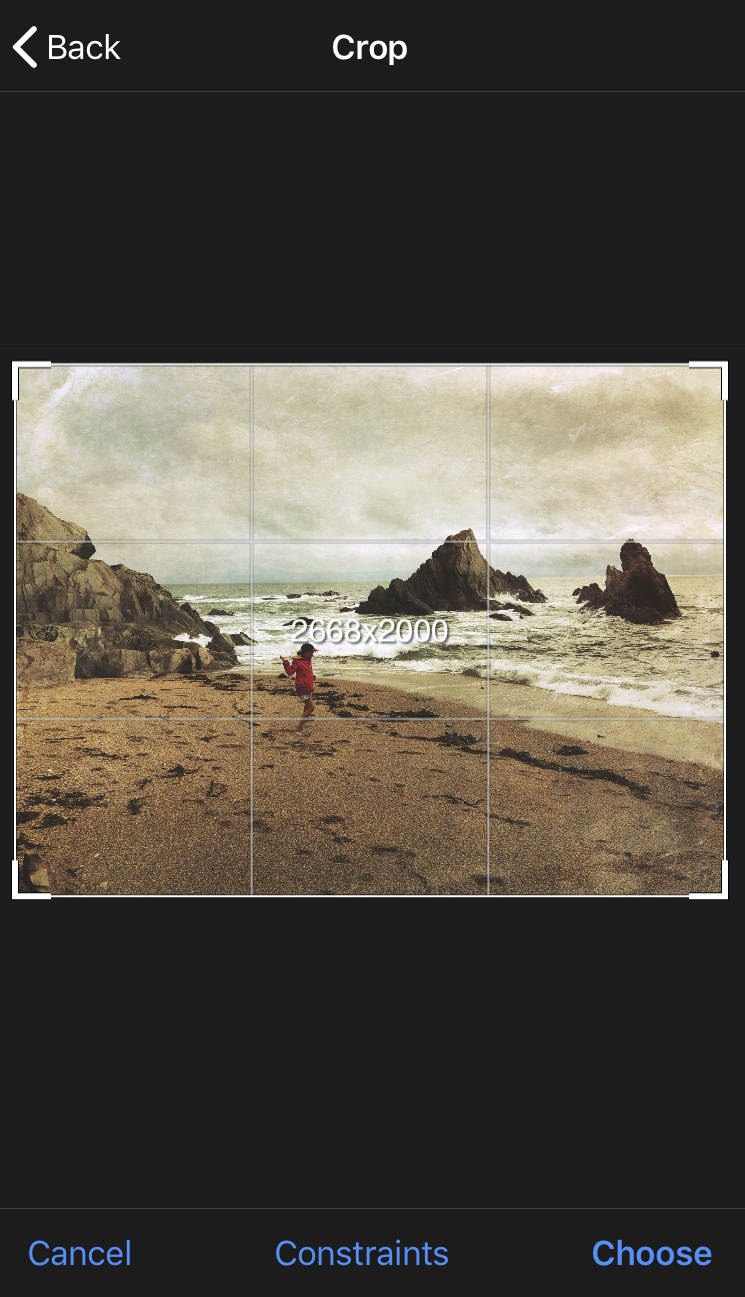
When you select an image to open, you have the option to crop the photo. If you wish to crop, drag the corner handles to remove the edges of the picture. Tap Constraints if you want to crop to a specific aspect ratio. Finally, tapChooseto open the image.
1.2 Navigate The Superimpose X Screen
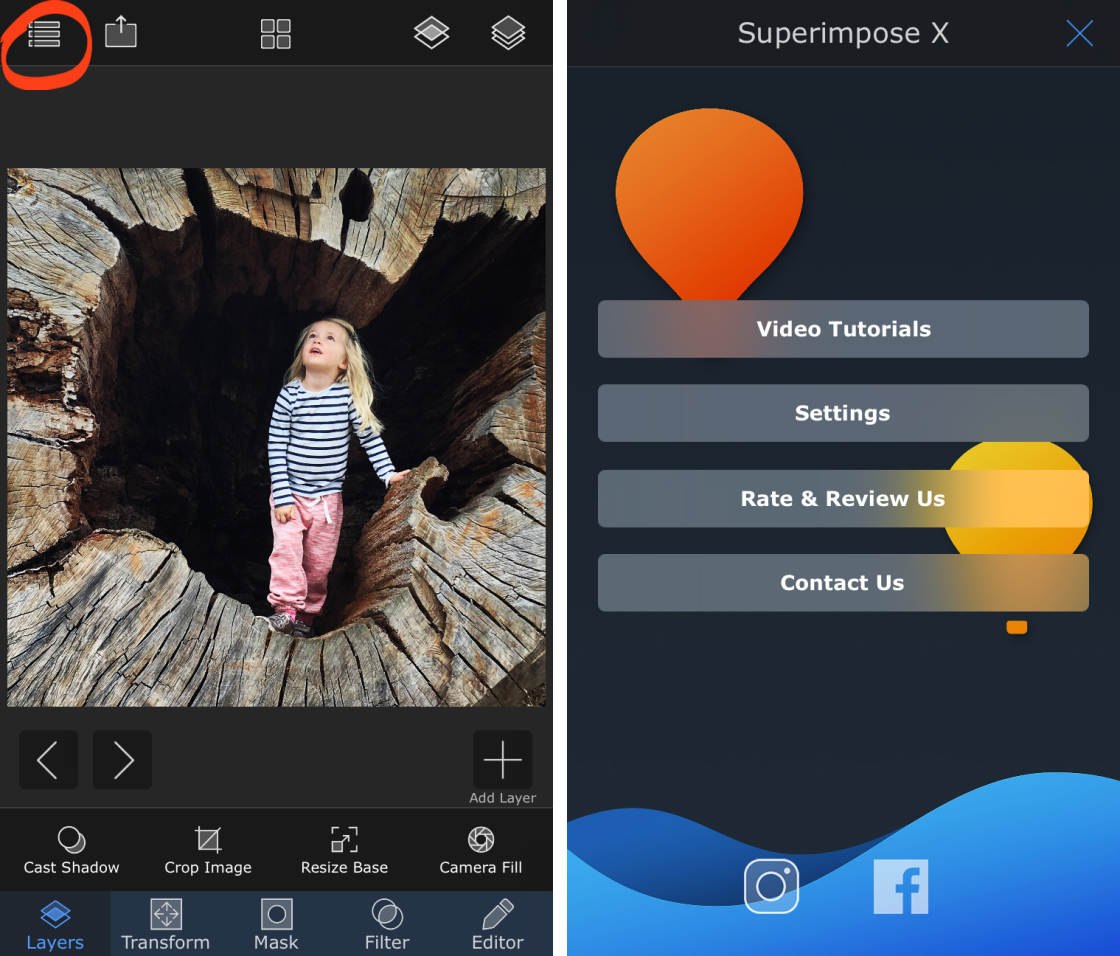
When your image opens, the following screen will appear.

You'll learn how to use many of these tools in this tutorial. Below is a brief description of each one.
The Menu icon (three horizontal lines) lets you access video tutorials and app settings.
The Share icon (rectangle with up arrow) allows you to save and share your creations.

The Library icon (four squares) takes you back to your photo library. From here you can also access the mask library, colors, sessions, etc.
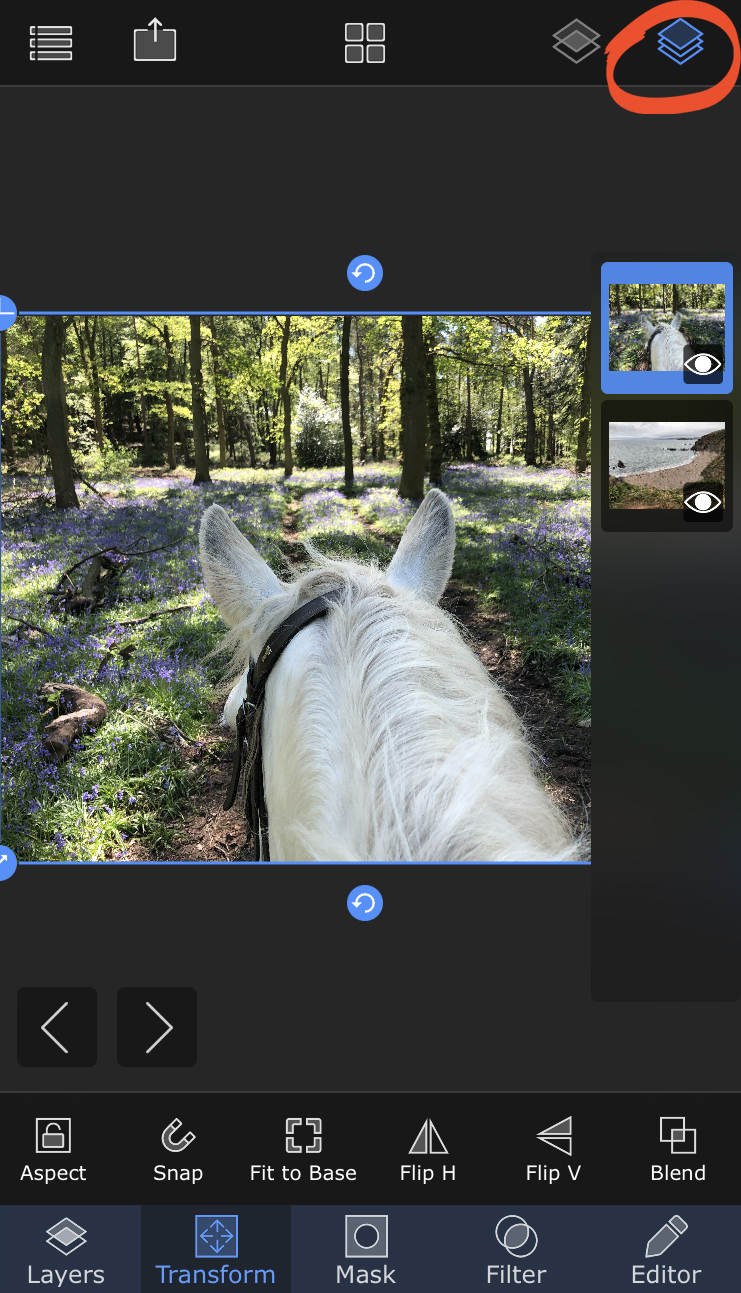
The Layers icon (three stacked squares) lets you view the individual layers in your composite image. You'll learn how to use Superimpose layers in section 3 of this tutorial.
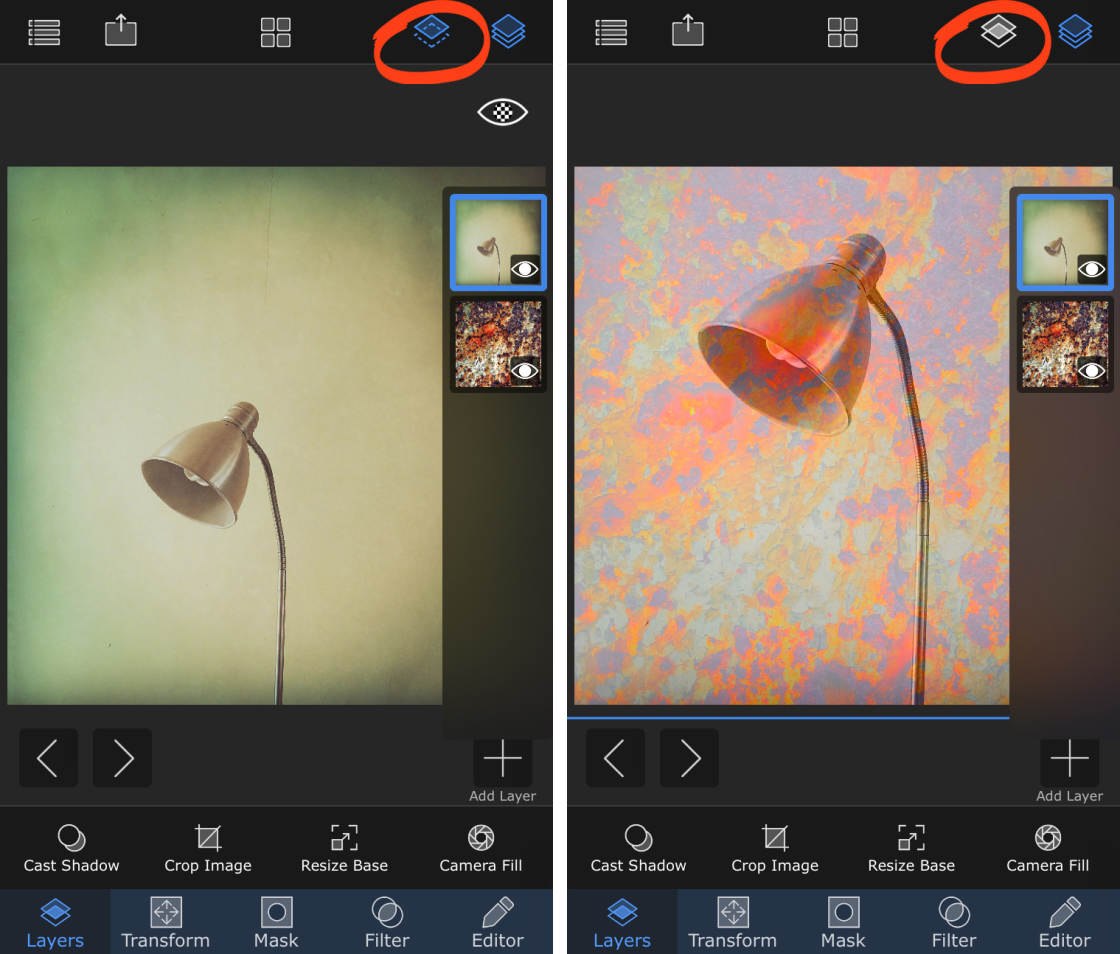
The View icon (two stacked squares) lets you toggle between viewing the current layer or the blended image.
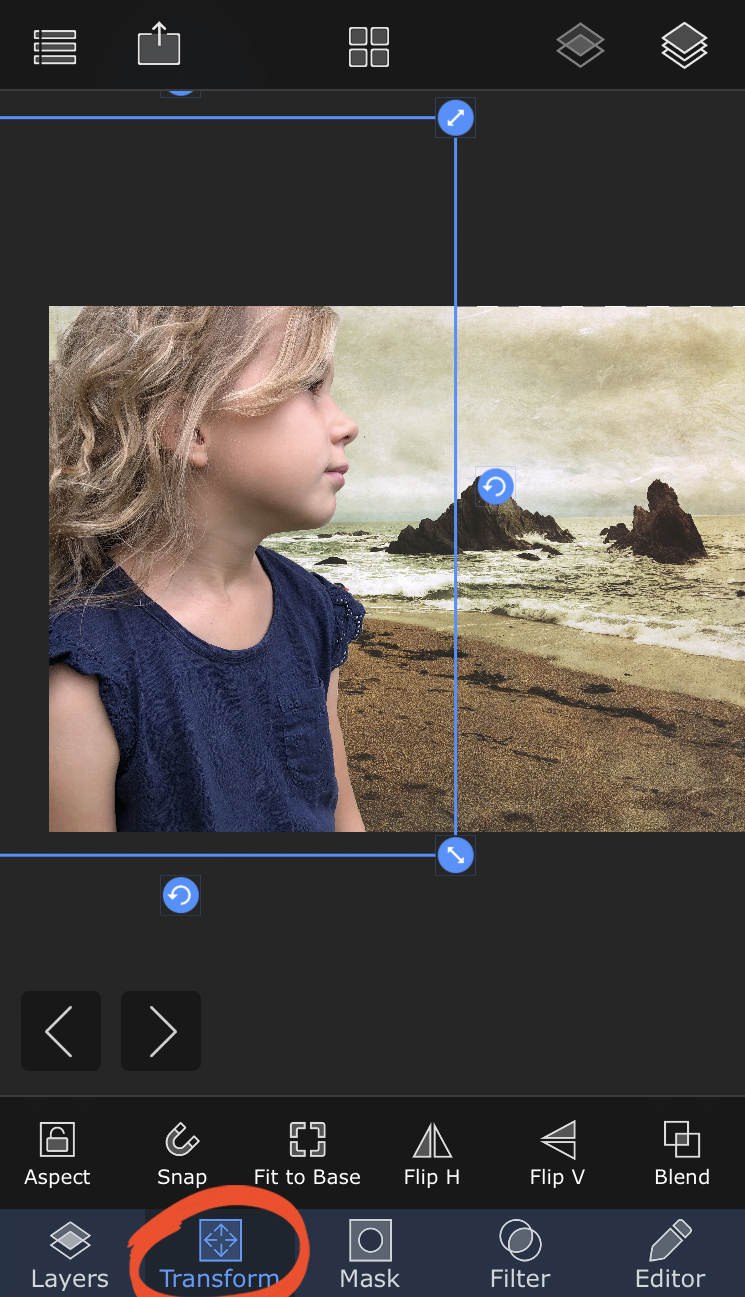
At the bottom of the screen are five icons: Layers, Transform, Mask, Filter and Editor. Each icon opens a tab containing different tools.
The Layers tab lets you add more images to your project. Each image appears on a new layer, and each layer can be edited individually. TheTransform tab provides tools for resizing, rotating and blending layers.
TheMask tab lets you erase parts of an image using a range of masking tools. You can then combine the remaining area with a different photo to make a composite image.
TheFilterand Editor tabs contain photo editing tools for enhancing your image. Tools include color and exposure adjustments, preset filters, and creative effects.
You should now be familiar with the layout of the Superimpose X app. Next, you'll learn how to use the mask tools to erase parts of an image.
In this section, you'll learn how to use the Superimpose mask tools. These tools let you "cut out" your subject by erasing the areas you don't want.
Once you've made your cutout, you can save it to the mask library. You can then add that mask/cutout onto another image at any time.
2.1 Open The Mask Tools
Start by opening the photo you want to cut out. If you're currently in the Superimpose editing screen, tap the Library icon (four squares) at the top of the screen.
Select the image you want to use from your photo library. Crop it if you wish, then tapChoose.
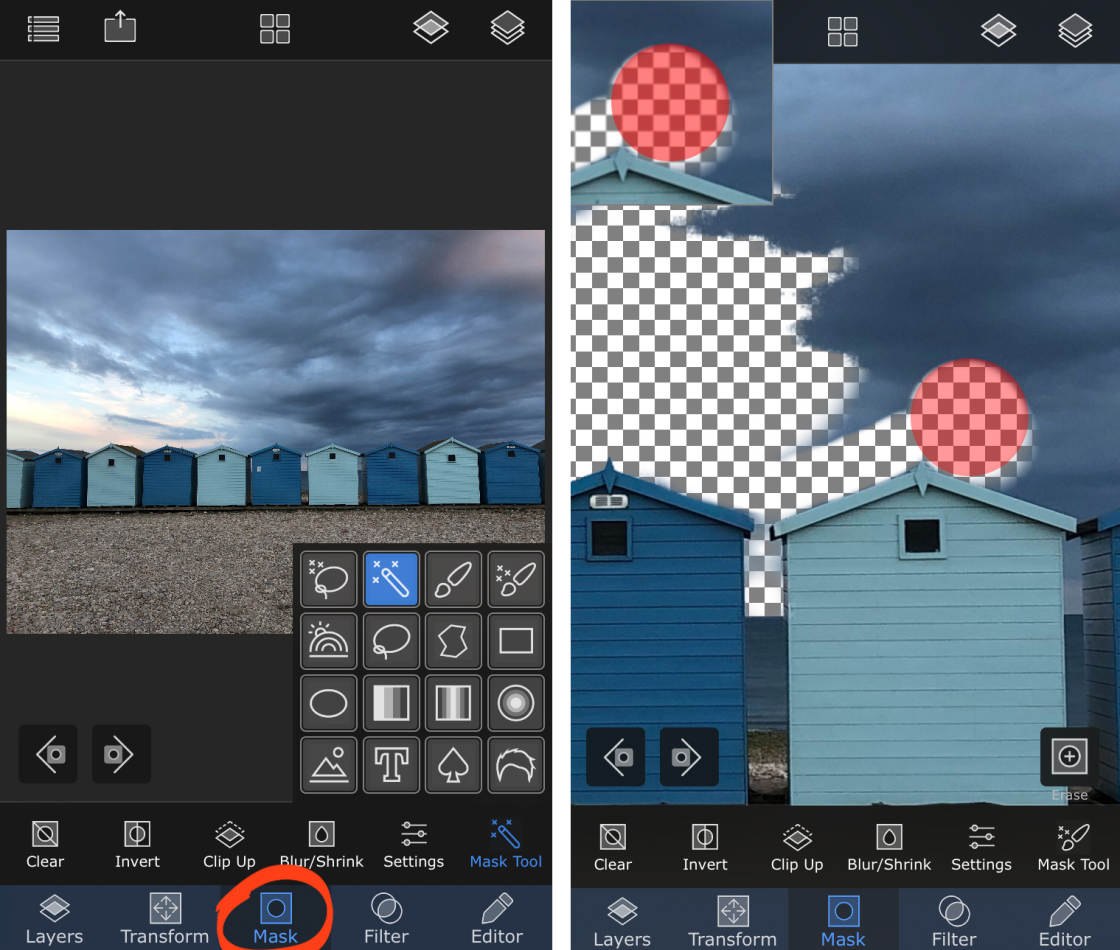
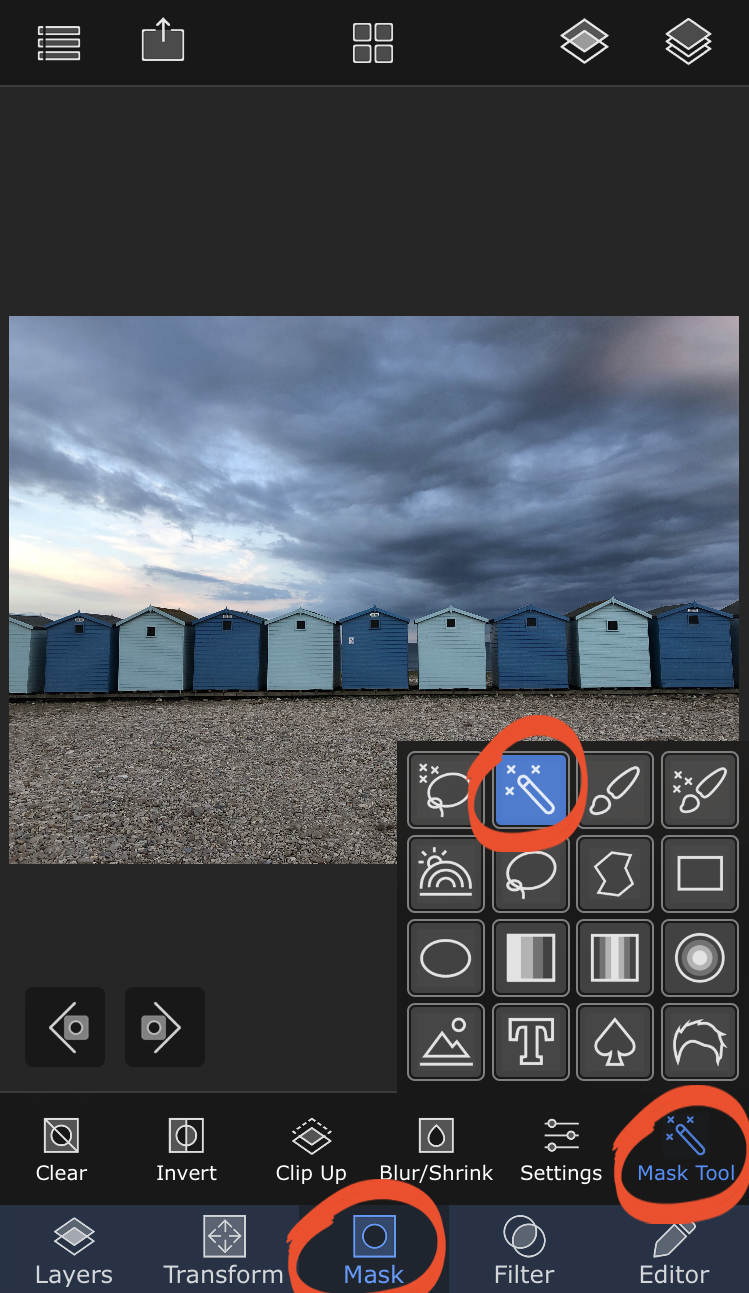
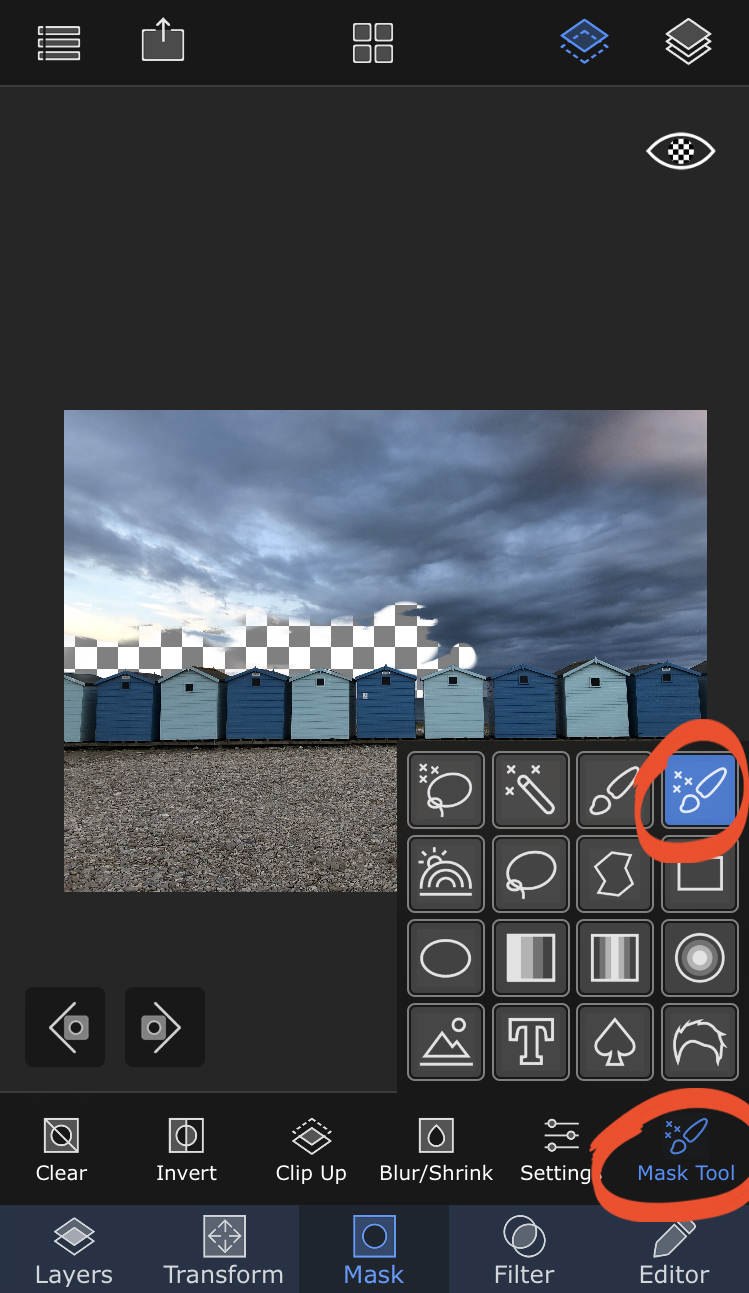
When you've opened the photo, tapMaskat the bottom of the screen. The mask options appear in the black bar beneath your image. Tap Mask Tool to open a pop-up list of 16 different mask tools.
These mask tools let you erase parts of the image you don't want. Each mask tool works in a slightly different way. Your choice of tool will depend on what you want to erase.
The "magic" or "smart" mask tools (marked with tiny star icons) let you remove large sections with a single tap. The Magic Wand and Smart Brush are good tools to start with. These automated mask tools speed up the task of erasing large areas.
The standard Brush and Lasso tools let you select areas manually. The Brush tool is great for fine-tuning your selection and working on small, detailed areas.
The Gradient mask tool allows for seamless blending of images. There are tools that let you cut out shapes and text. And there's even a tool to help you cut around hair.
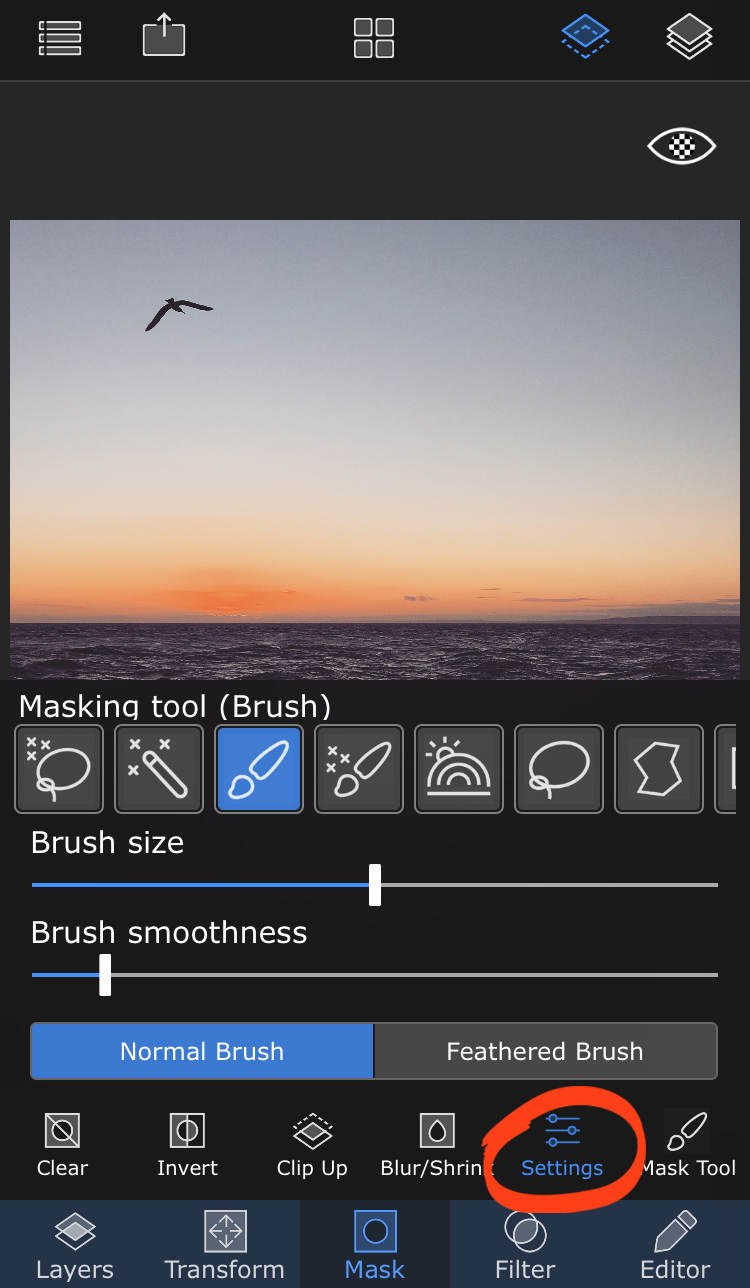
Once you've selected a mask tool, you can tap Settings to customize the tool. For example, you can change the brush size, smoothness and feathering.
Read on to learn how to use some of the most popular mask tools to erase parts of your image.
2.2 Use The Magic Wand To Remove Large Areas Of Color
The Magic Wand mask tool is perfect for quickly erasing large blocks of a single color. Use it to select areas of sky, grass, sand, water, etc.
Ensure the Masktab is active at the bottom of the screen, then tapMask Tool. Select the Magic Wandtool from the pop-up list.
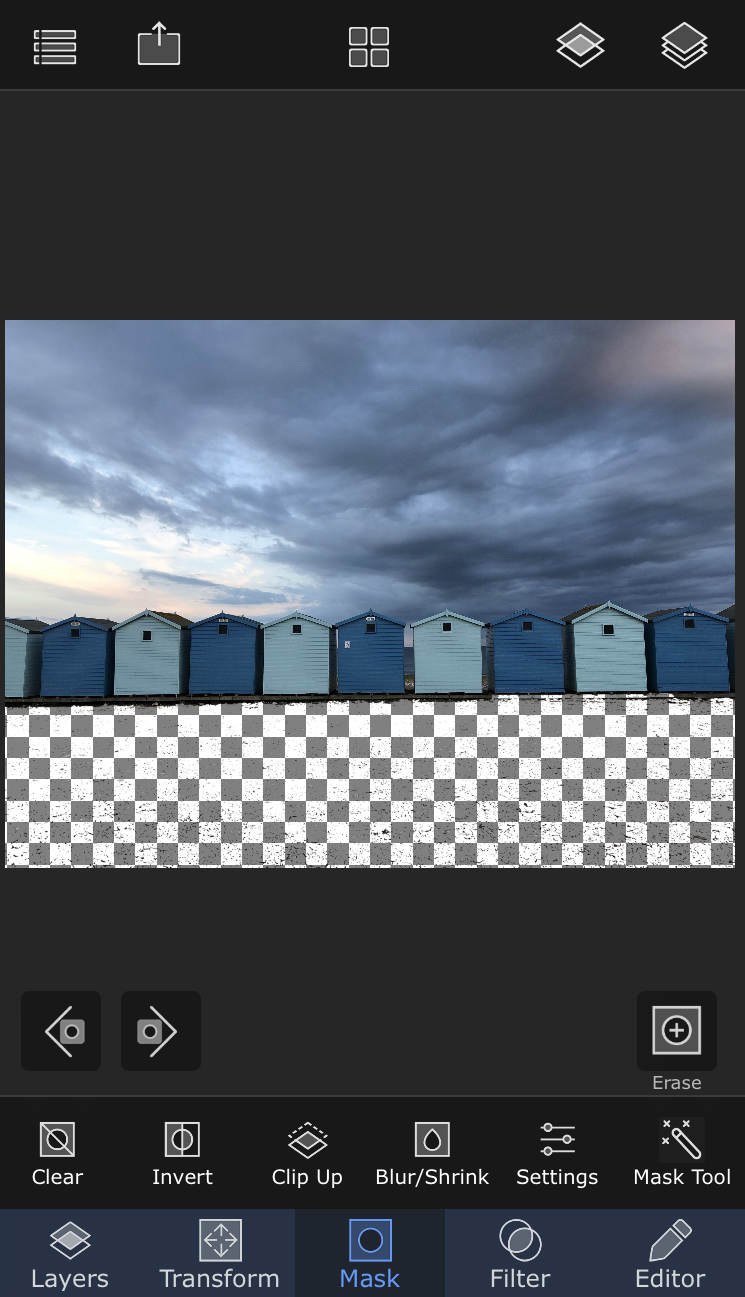
Now tap once on the area you want to remove. All adjoining areas of similar color will be erased. A gray and white checkerboard indicates the transparent areas of your image, i.e. the areas that have been erased.
If you erase too much of your image, tap the back arrow beneath your photo to undo. Then tap Settings, and move the Threshold slider left a bit. This changes the sensitivity of the tool, so that only very similar colors to the one you tap are erased.
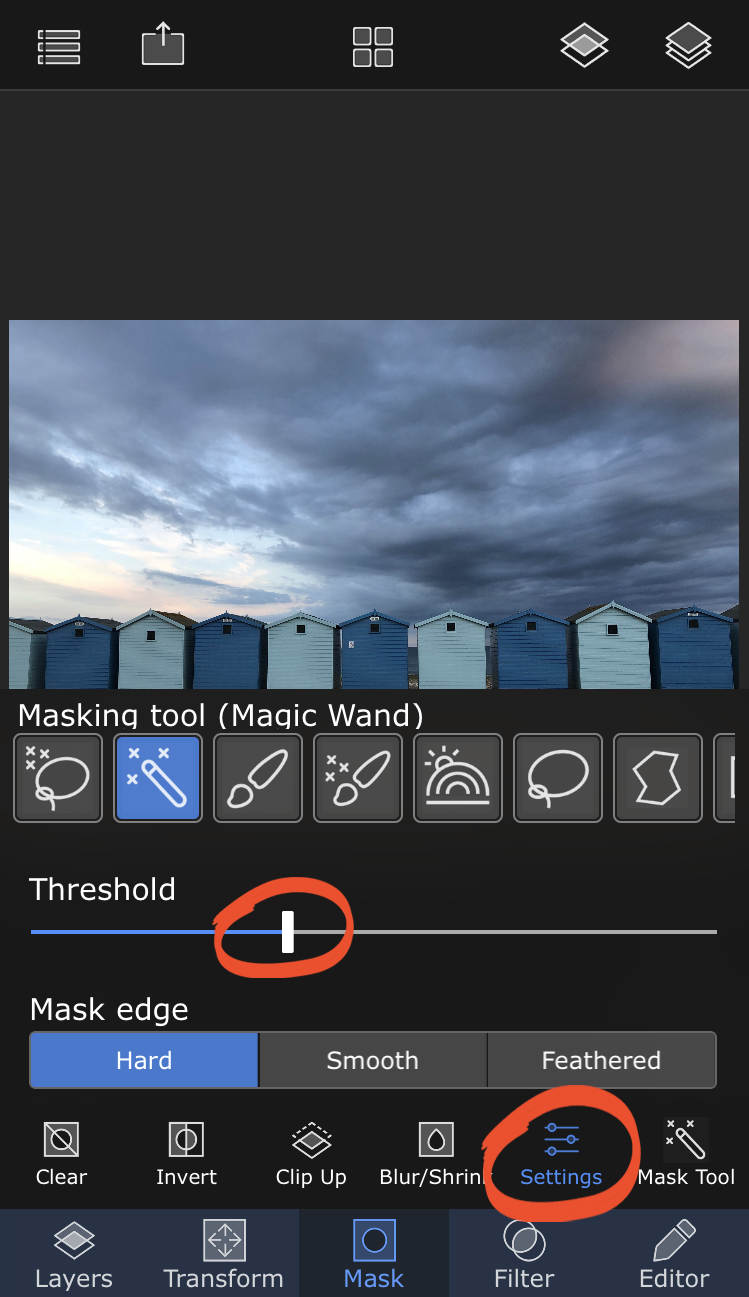
Now tap the area you want to remove again. You may have to undo and adjust the Threshold setting a few times to get the selection right.
Don't worry if the selection isn't perfect. You can tidy it up later using the manual Brush tool.
2.3 Use The Smart Brush For Accurate Edge Selection
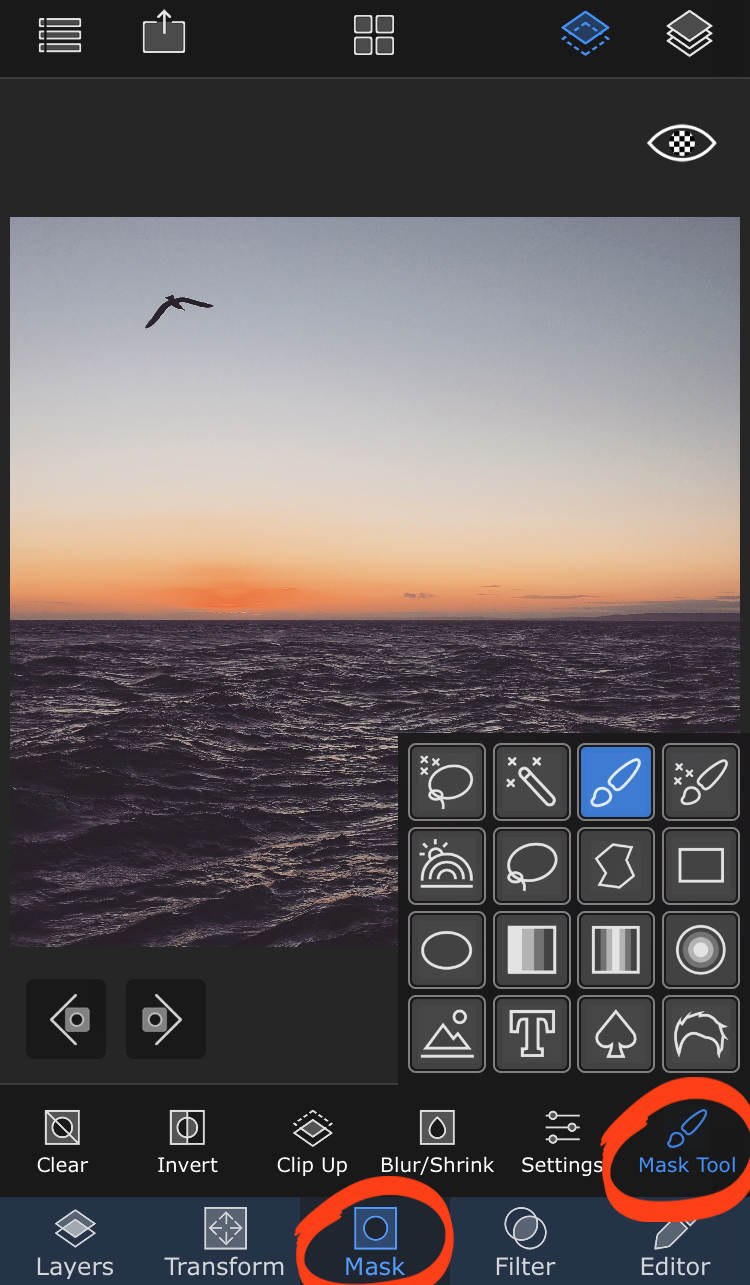
The Smart Brush mask tool works like a normal brush tool, i.e. you brush over the image with your finger. But its "smart" feature automatically identifies edges that you brush over. It's great for making accurate selections around the edges of a subject.
TapMask Tool, then select the Smart Brushtool.
Pinch to zoom in on the area you want to erase. Use two fingers to drag the image to the correct position if necessary.
Use your finger to brush over the areas you want to erase. Take your time to carefully work your way around the outline of the area you want to keep.
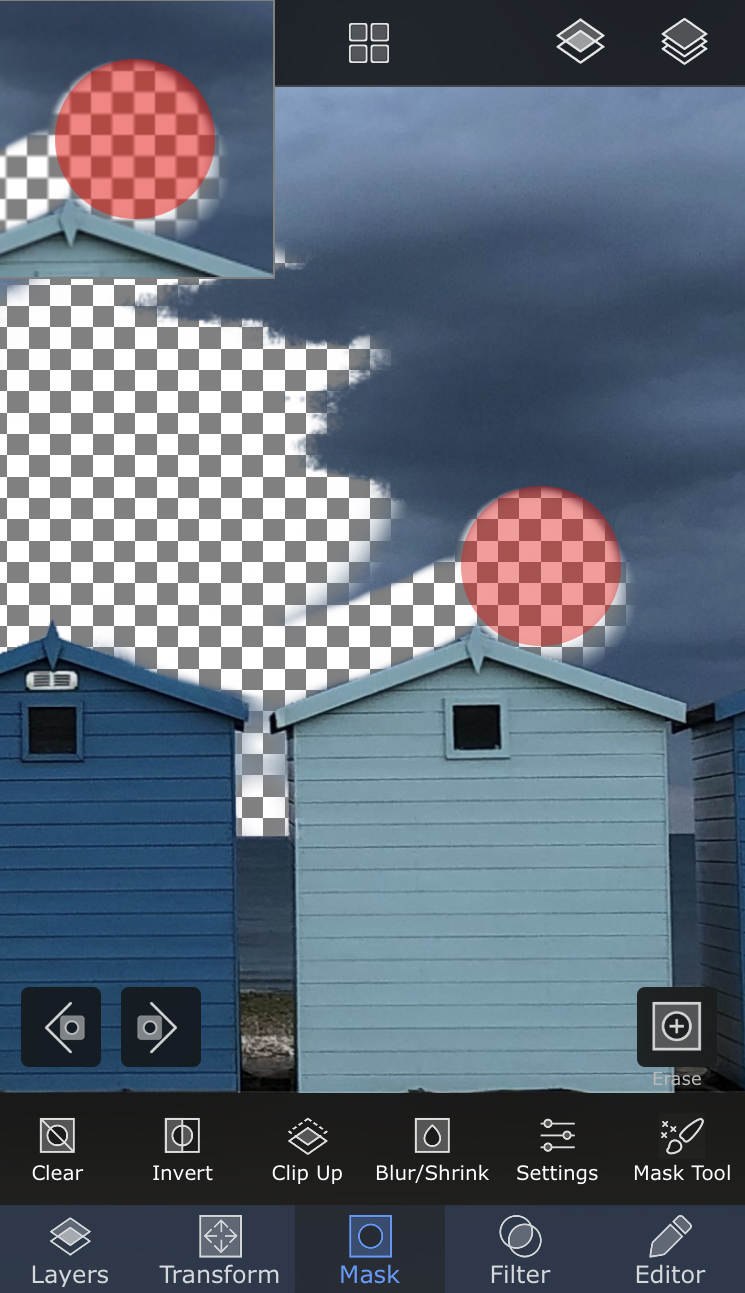
Work on small areas at a time. Doing this means you'll only need to undo a small section of your work if the area removed isn't quite right.
If necessary, open theSettings at the bottom of the screen, and adjust the brush size and strength. You'll want to set these lower when working on small, detailed areas of your image.
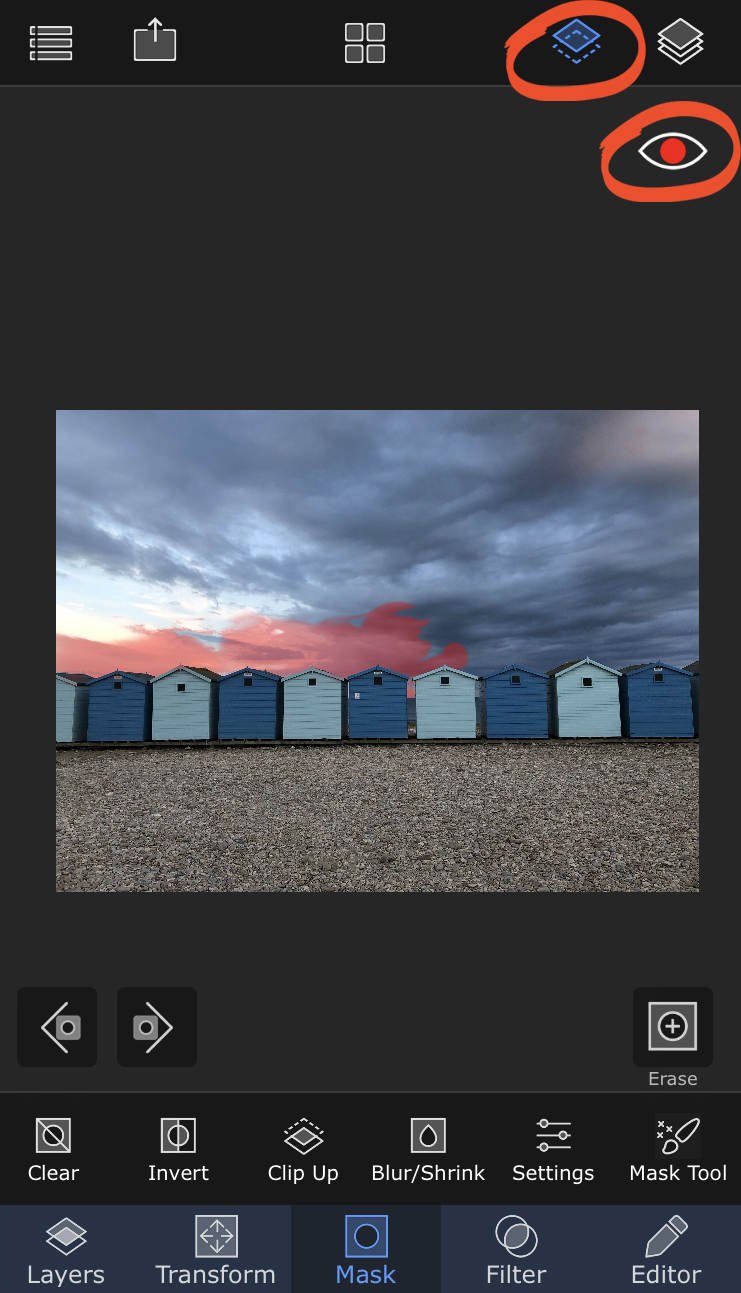
The default setting for showing erased areas is the gray and white checkerboard. But you may find it easier to see what you're erasing if you change this to a color. To do this, tap the View icon (two stacked squares) at the top of the screen. Then tap the Eye icon to toggle through the different colors.
2.4 Use The Brush For Precise Detail
The Brush is a fully manual mask tool. It doesn't make automatic selections based on color or edges. You use this tool entirely freehand, and any areas you brush over will be erased.
The Brush is useful for fine-tuning your masked area. You can erase or restore any mistakes that you made using other mask tools.
TapMask Tool, then select the Brushtool.
Zoom in on the area you want to work on. If necessary, tap Settings, then adjust the brush size and smoothness. There's also the option to select a normal brush or feathered brush. The feathered brush creates softer edges around your selection.
Use your finger to carefully brush over the areas you want to erase. The area you're working on will also appear in the corner of the screen. This makes it easier to see what you're doing when working on small sections of your image.
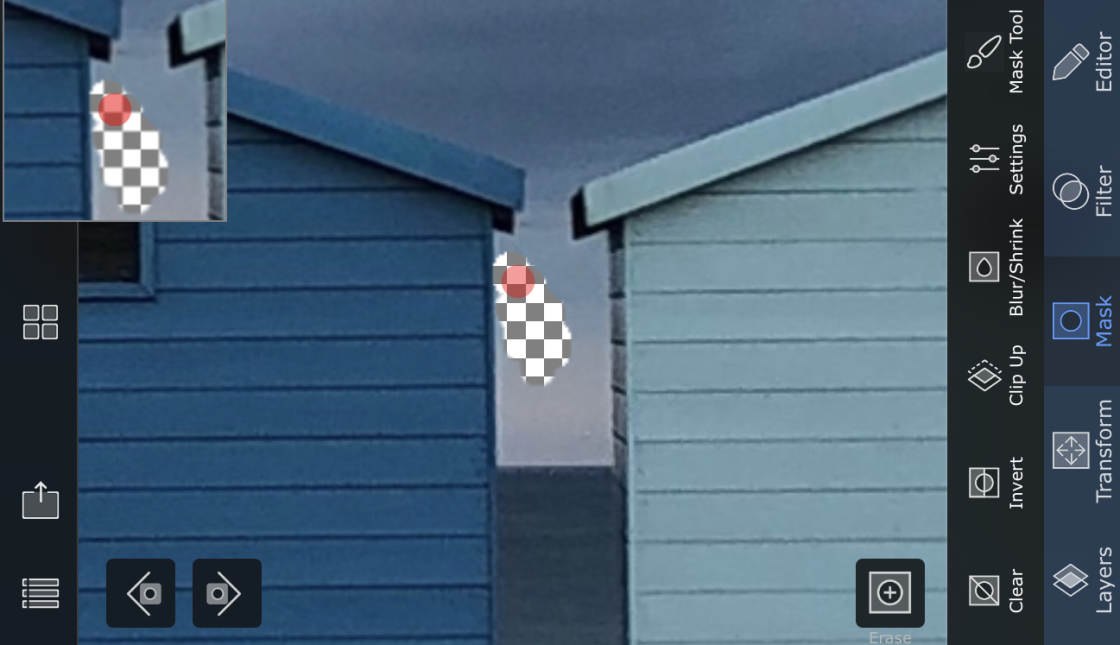
Ensure you work in small sections as it's quite easy to make errors. If you go wrong and erase part of the image that you want to keep, you have two options.
You can use the back arrow to undo. Or you can switch to Restore mode (as opposed to Erase mode). Restore mode lets you brush over erased areas to bring them back.
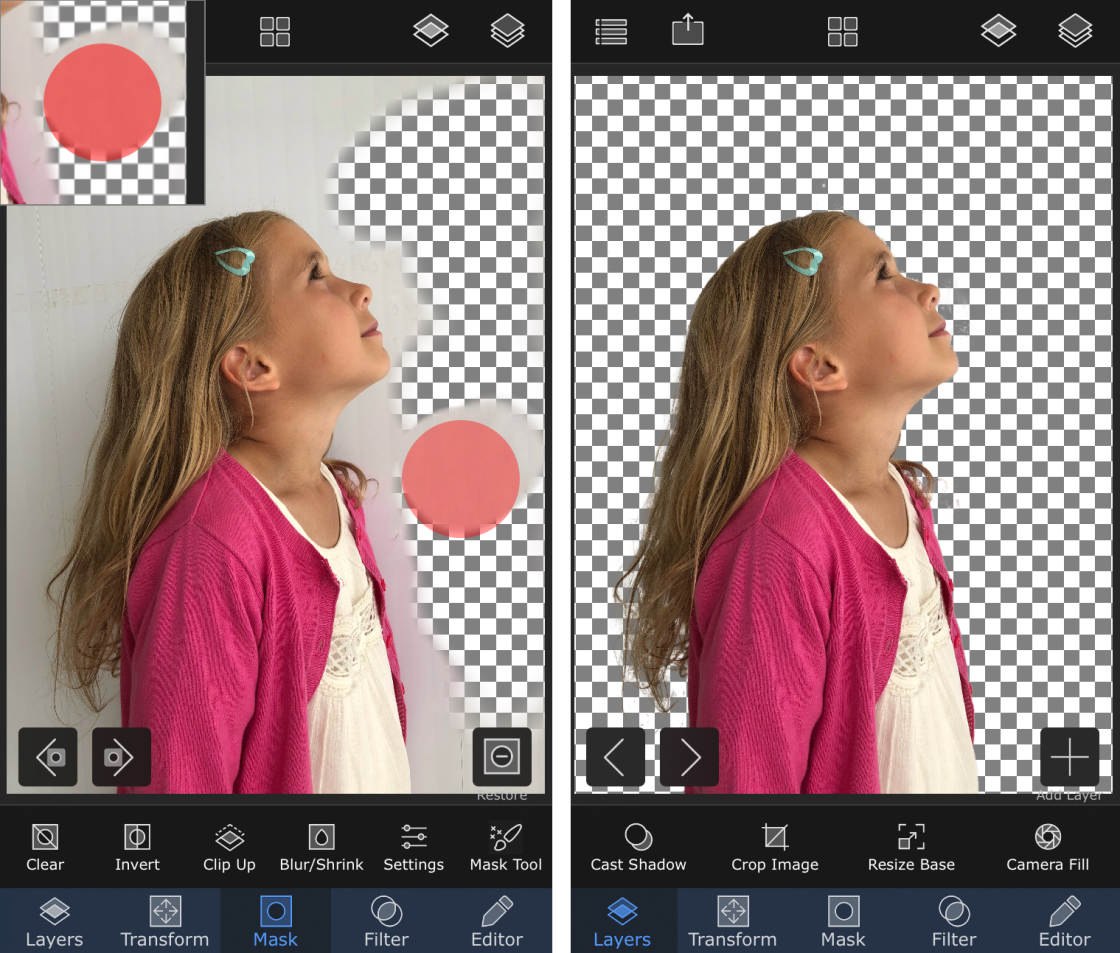
To restore part of your photo, tap the square icon at the bottom right of your image (above the Mask Tool). When you see the wordRestorebeneath the icon, brush over an erased area to bring it back.
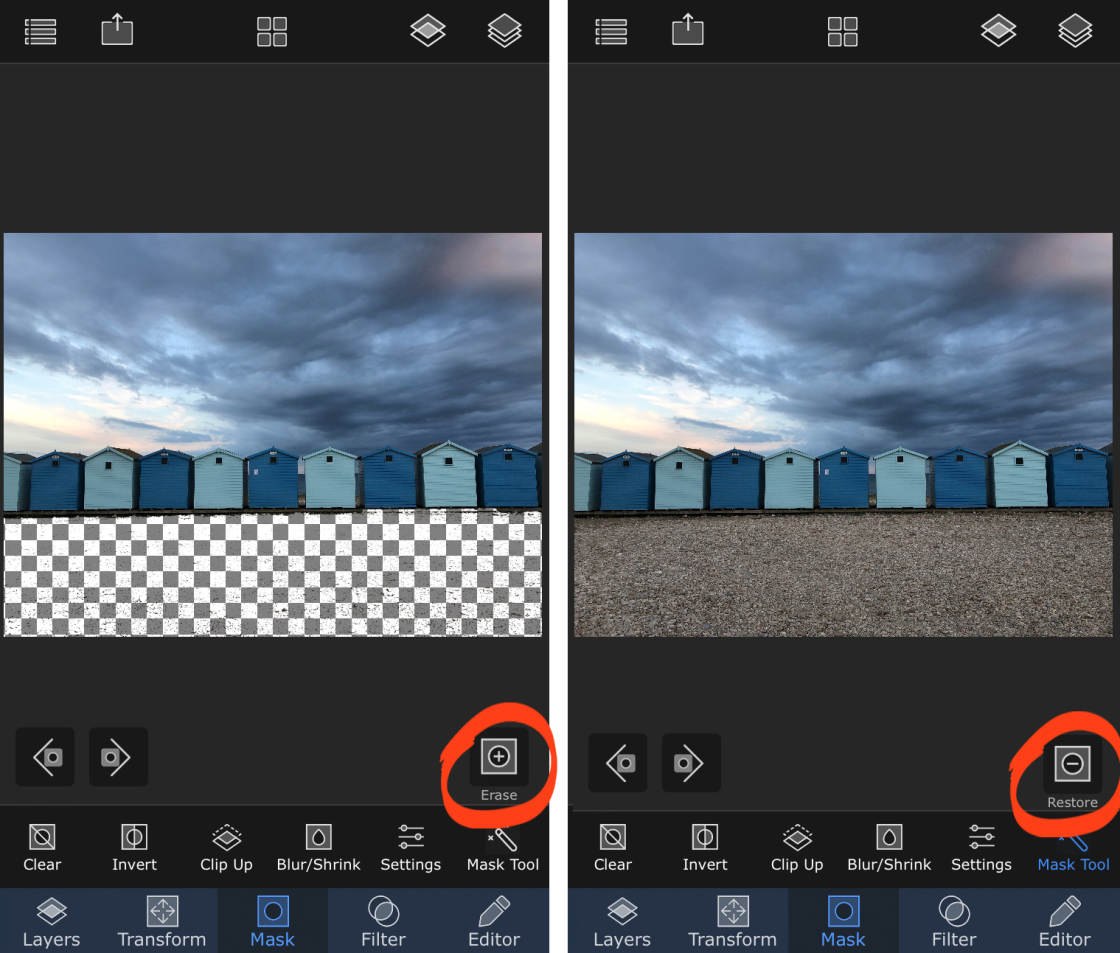
To return to Erase mode, tap the square icon at the bottom right. When you see the wordErasebeneath the icon, brush over the image to erase.
2.5 Tips For Using Mask Tools
The more accurate you are when using the mask tools, the better your final composite image will look. Take your time to make precise, accurate selections using the most appropriate mask tools for the job.
Use the mask settings to customize the tool you're using. For example, change the brush size to suit the size of the area you want to erase. Or adjust the edges of the mask to make them hard, smooth or feathered.
For best results, you'll usually need to use a combination of automated and manual mask tools.
If you make a mistake when using the mask tools, tap the back arrow beneath the photo to undo. Tap the forward arrow to redo.
To restore an area that you erased by mistake, switch to Restore mode. Then use a mask tool to select the areas you want to bring back. Switch back to Erase mode to carry on erasing.
2.6 Save Your Cutout To The Mask Library
When you've finished erasing parts of your image, you can save your cutout to the mask library. Masks that you save can be inserted onto other images at any point in the future.
So if you think you'll want to use your cutout image in multiple projects, ensure you save it to the mask library. This will save you a lot of time, as you only have to mask the image once.
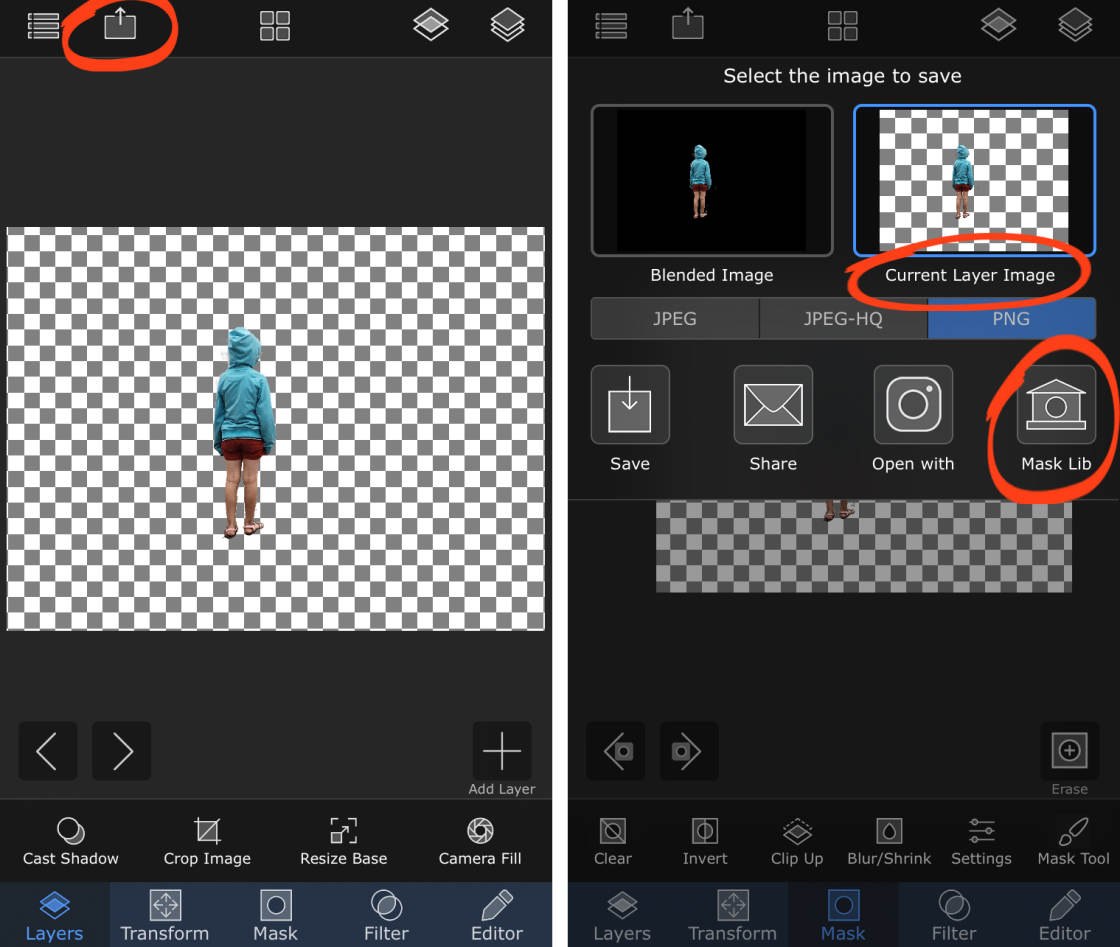
To save your mask, tap the Shareicon (rectangle with arrow) at the top of the screen. Select Current Layer Image, then tap Mask Lib to add your cutout to the mask library.
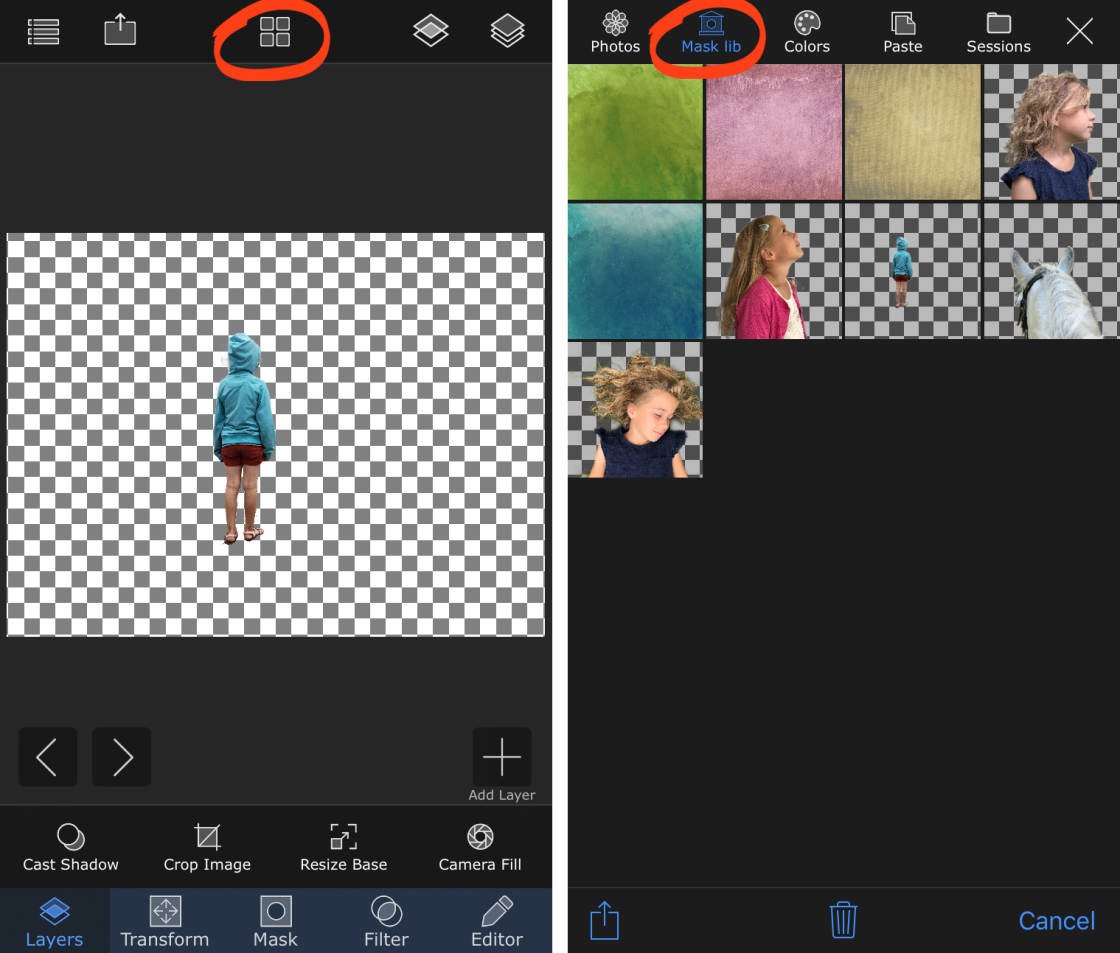
For future projects, you'll be able to open images from your mask library, as well as your photo library. To view images in your mask library, tap the Libraryicon (four squares) at the top middle of the screen, then tap Mask Lib.
You now know how to cut out part of an image with the mask tools, and save the cutout to your mask library. In the next sections, you'll learn how to use masks and layers in Superimpose X to combine images together.
You'll learn how to cut out a subject from one picture, and place them onto another background photo. And you'll discover how to blend two photos together to create stunning double-exposures.
3. Replace The Background Using Masks & Layers
With the Superimpose app, you can easily replace the background in a photo. In this section, you'll learn how to add a subject from one image onto the background of another photo.
You can use this technique to change the sky in a photo. Replace a dull gray sky with a beautiful blue sky from a different photo.
It's also great for adding a person into an empty scene. A person creates a strong focal point, gives a sense of scale to your photo, and adds a storytelling element.
The example below shows how I moved the girl from the beach photo onto a different background image.
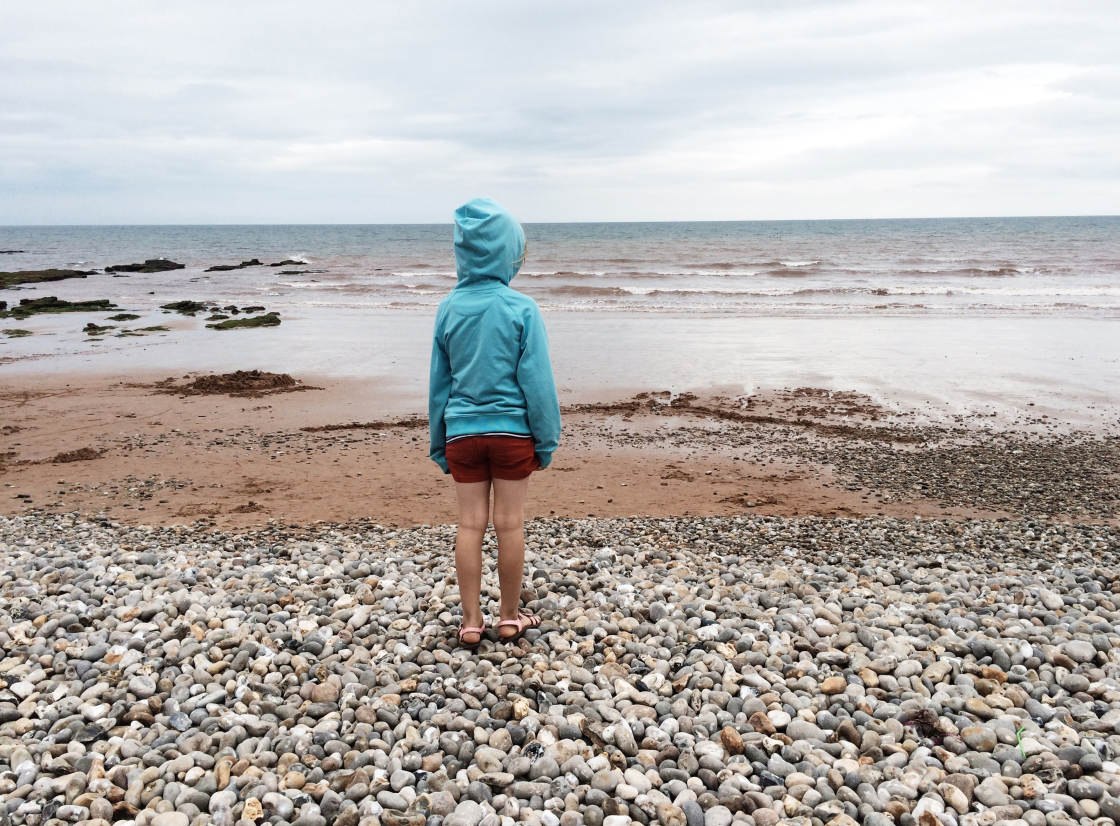 Original photo of a girl on a beach
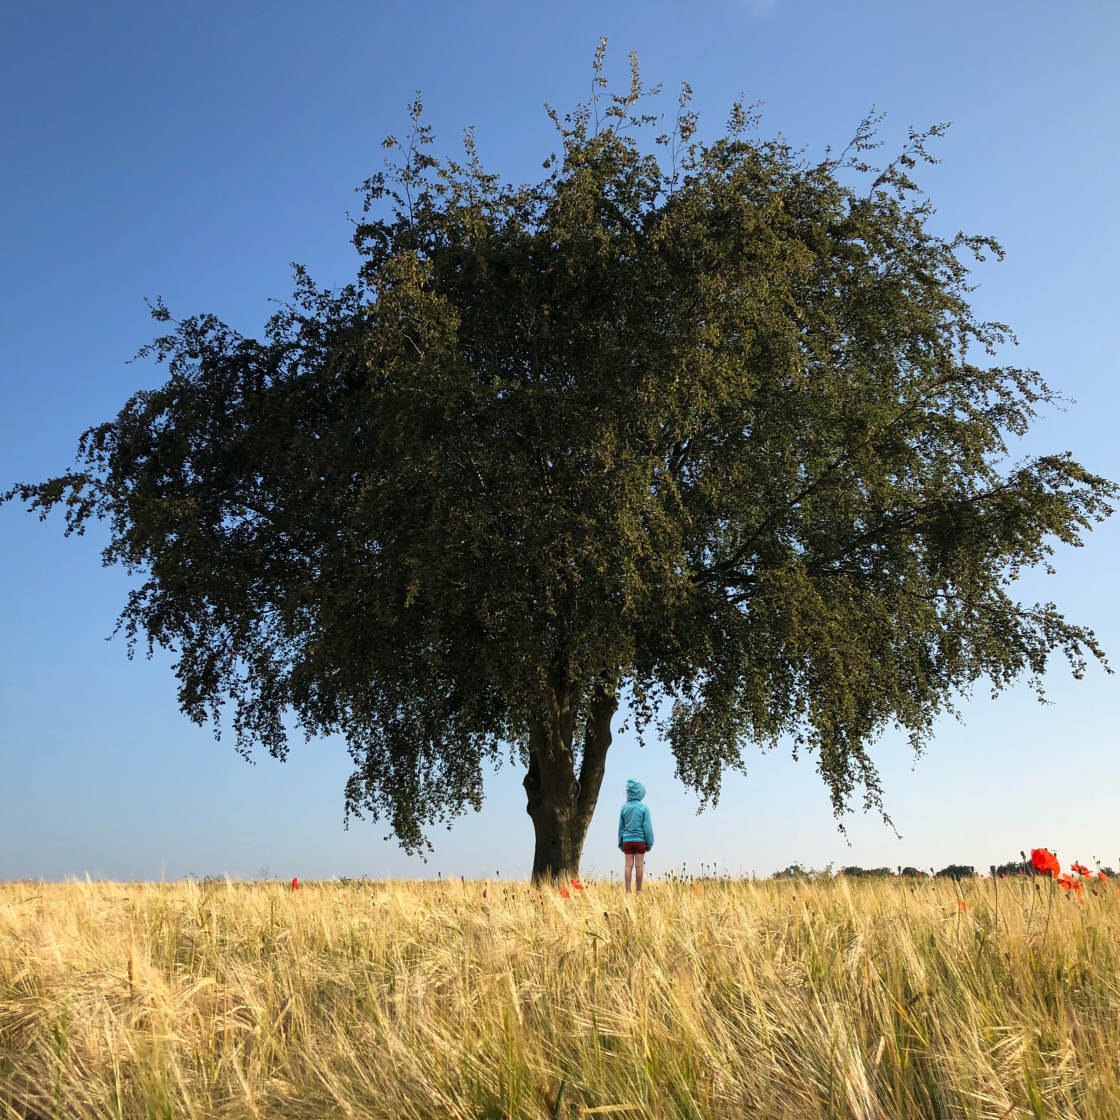 The girl was cut out of the beach photo and placed into this tree photo
I used the mask tools to erase the background in the beach photo. I then added the girl onto a new layer in the tree photo.
Follow the step-by-step instructions below to learn how to change the background in your own iPhone photos.
3.1 Open Your Background Image
Start by opening the photo you want to use as the background. If you're currently in the Superimpose editing screen, tap the Library icon (four squares), and ensurePhotos is active.
Select the photo you want to use. Crop the image if you wish, then tapChoose.

3.2 Add Your Second Image On A New Layer
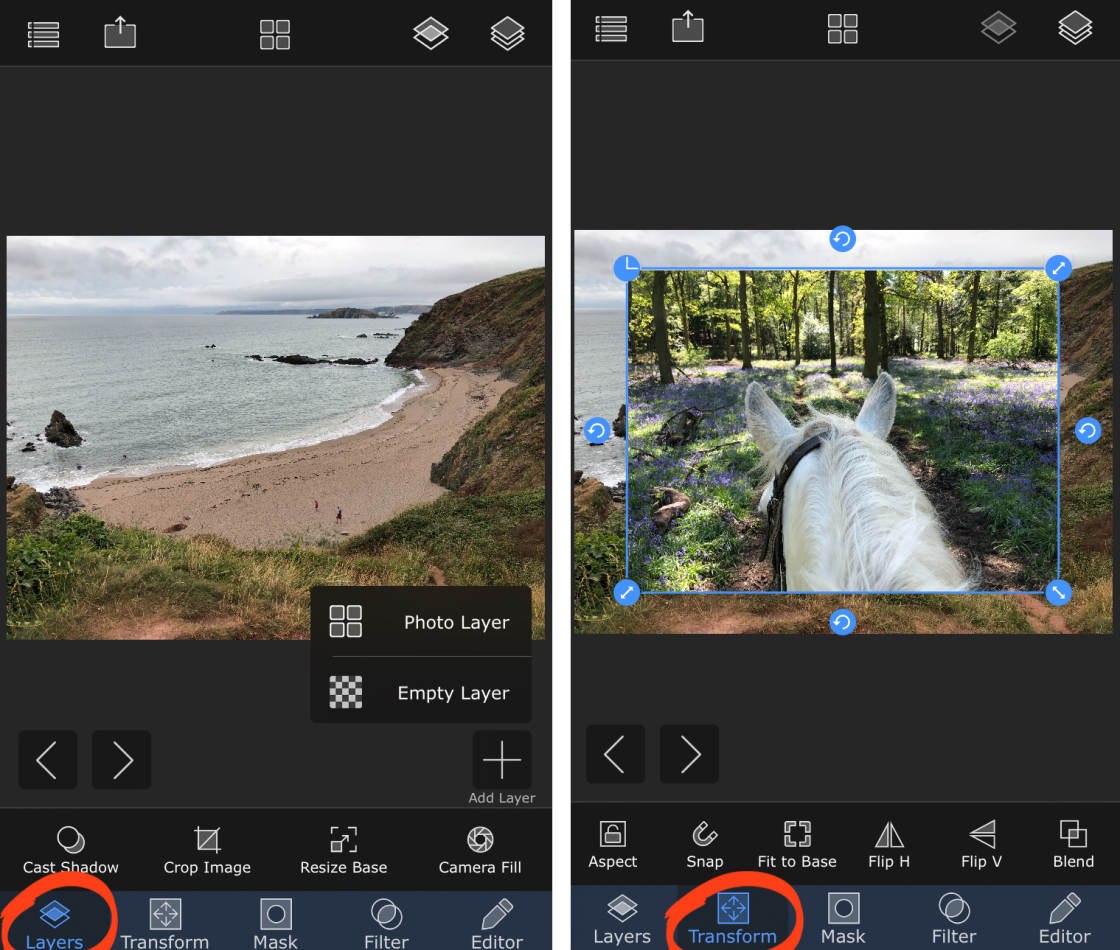
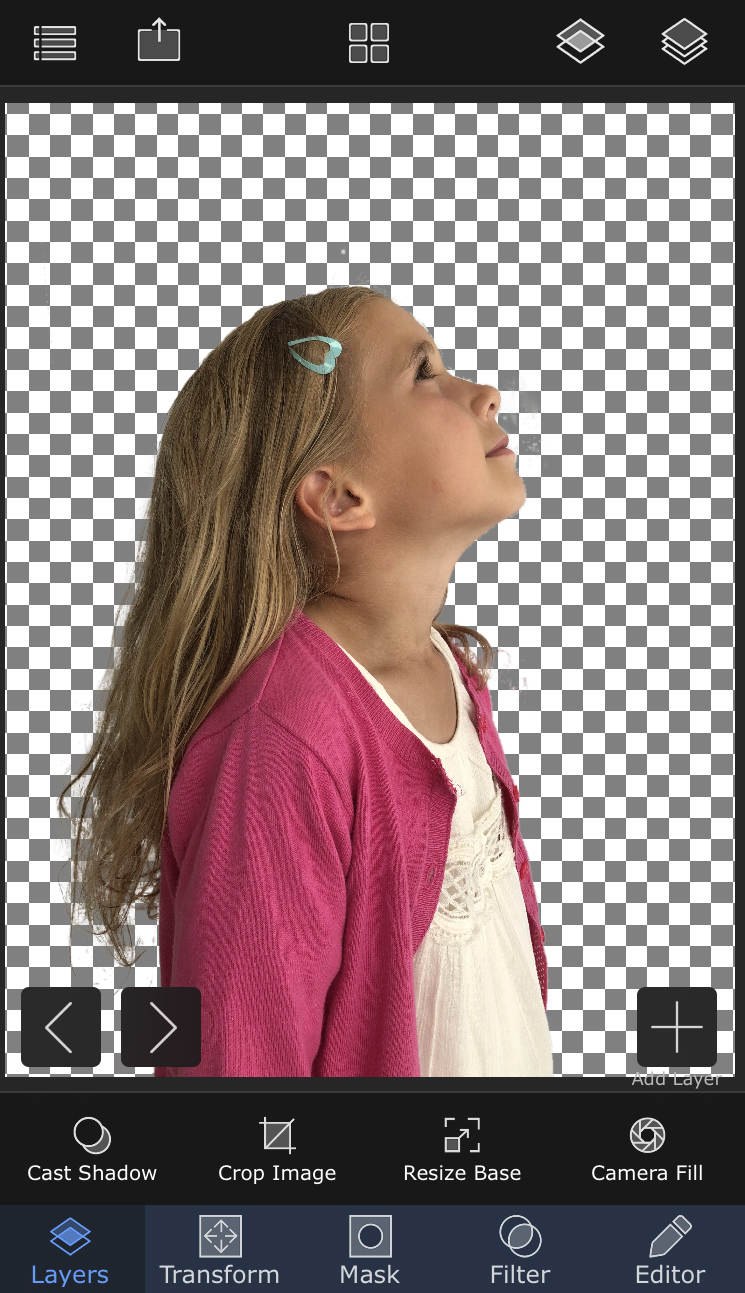
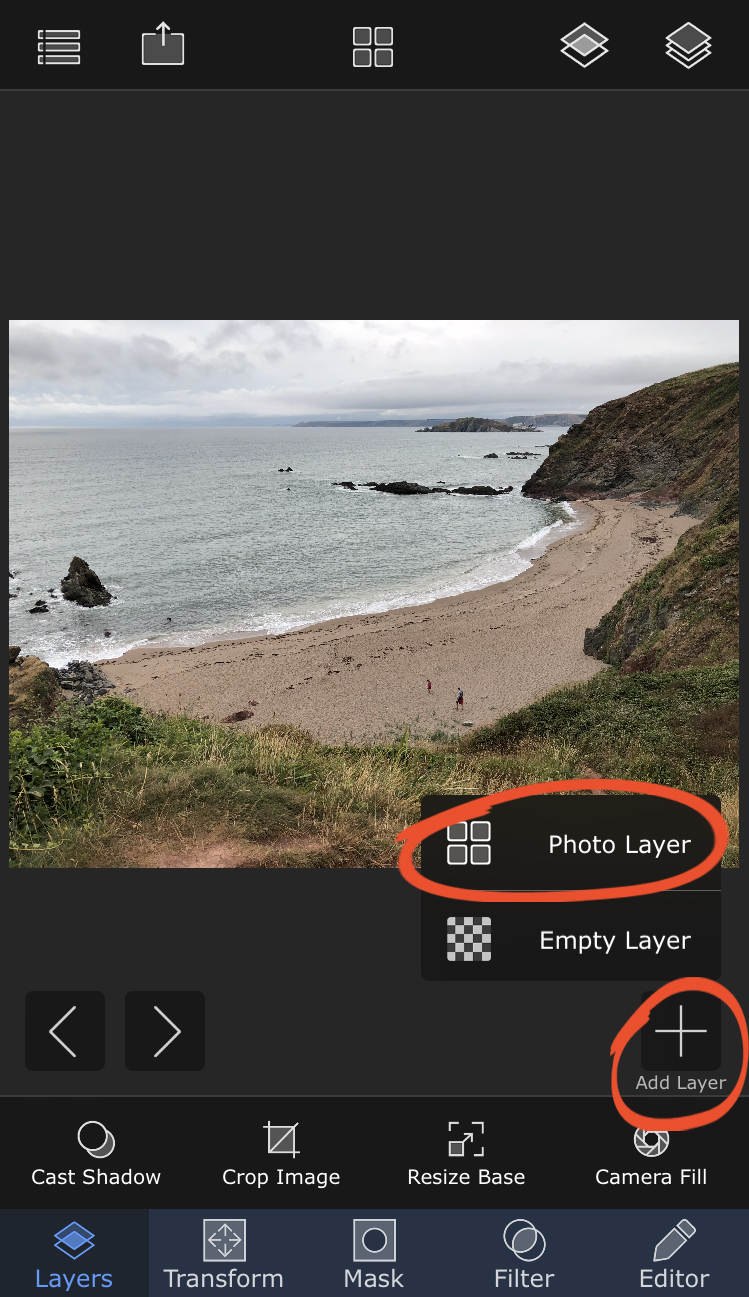
You'll now add your second photo on top of the background image. Ensure the Layers tab is active at the bottom of the screen. TapAdd Layerat the bottom right of the photo, then tapPhoto Layer.
You now have two options. You can open an image from your photo library, and then use the mask tools to erase the parts you don't want. Or you can open a saved mask from the mask library. Remember, a mask is an image that you've already cut out and saved.
Select your preferred option – eitherPhotosor Mask Lib – and open the image you want to add onto the background. The second photo will appear on top of the background image.
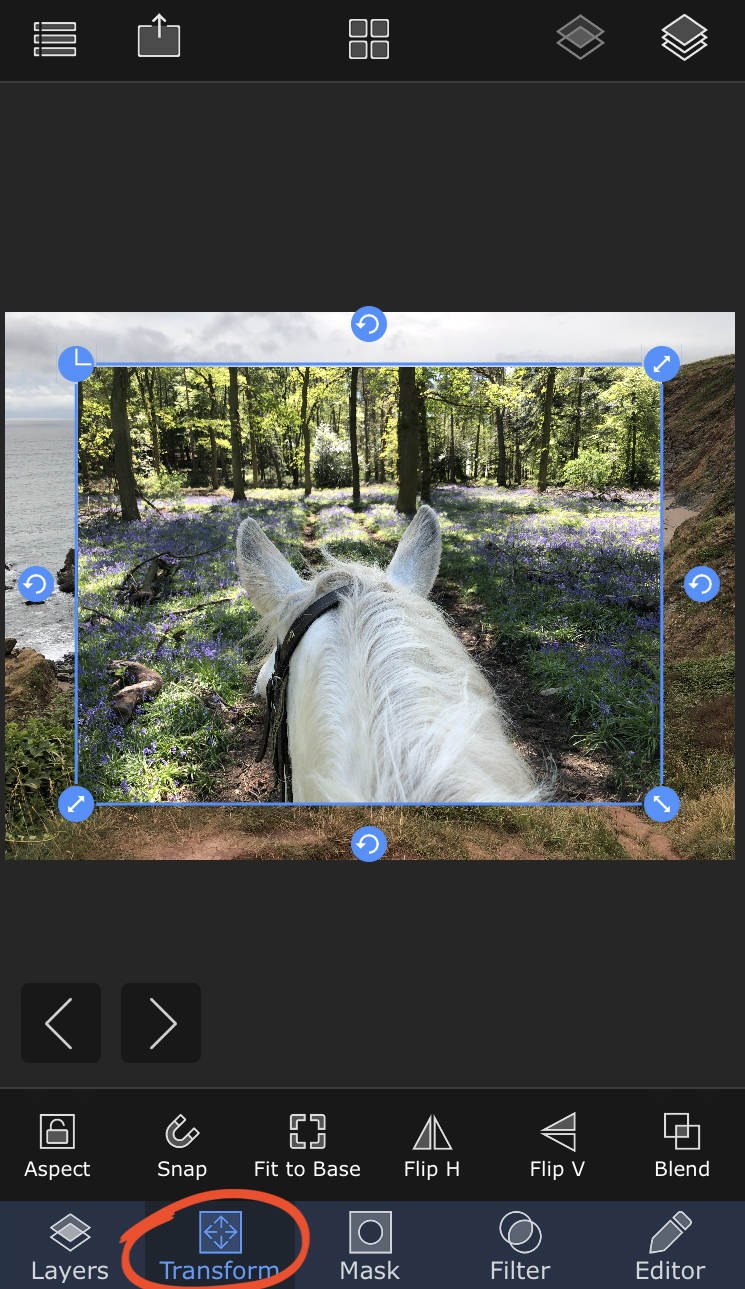
If you need to move or resize the top image, tapTransform at the bottom of the screen. To resize, drag the corners of the photo. Or tap Fit To Base to make it the same size as the background image. To move the image, tap and drag.
To see the individual layers in your project, tap the Layers icon (three stacked squares) at the top right. The layer thumbnails appear on the right of the screen.
When working with layers, ensure the layer you want to work on is active in the layers palette on the right. If you want to erase parts of the top layer so the bottom image shows through, ensure the top layer is active.
3.3 Erase Areas Using Mask Tools
If you added an entire photo as the top layer, rather than a saved mask, you'll need to erase the parts of the image you don't want. This allows the background image on the bottom layer to show through.
Ensure the top layer is active, then tap theMask tab. Select the Mask Tool you want to use. Erase the parts of the layer that you want to remove.
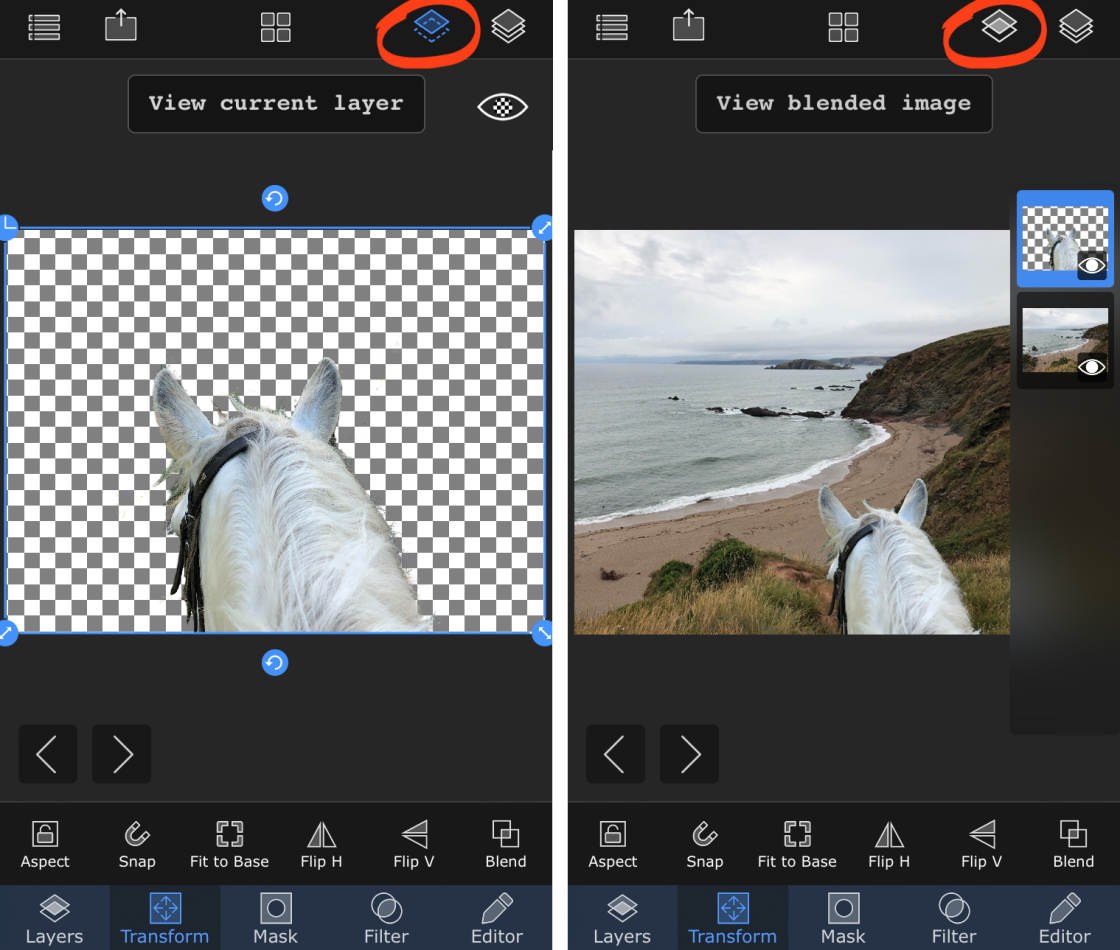
When masking the layer, you can choose to see only that layer, or all layers to give you a preview of the final blended image. To toggle between these two views, tap the View icon (two stacked squares) at the top of the screen.
When you've masked the layer, you can save the cutout to your mask library. This allows you to use that cutout in another project in the future. Ensure the masked layer is active, then tap theShareicon (rectangle with arrow) at the top of the screen. Select Current Layer Image, then tapMask Lib.
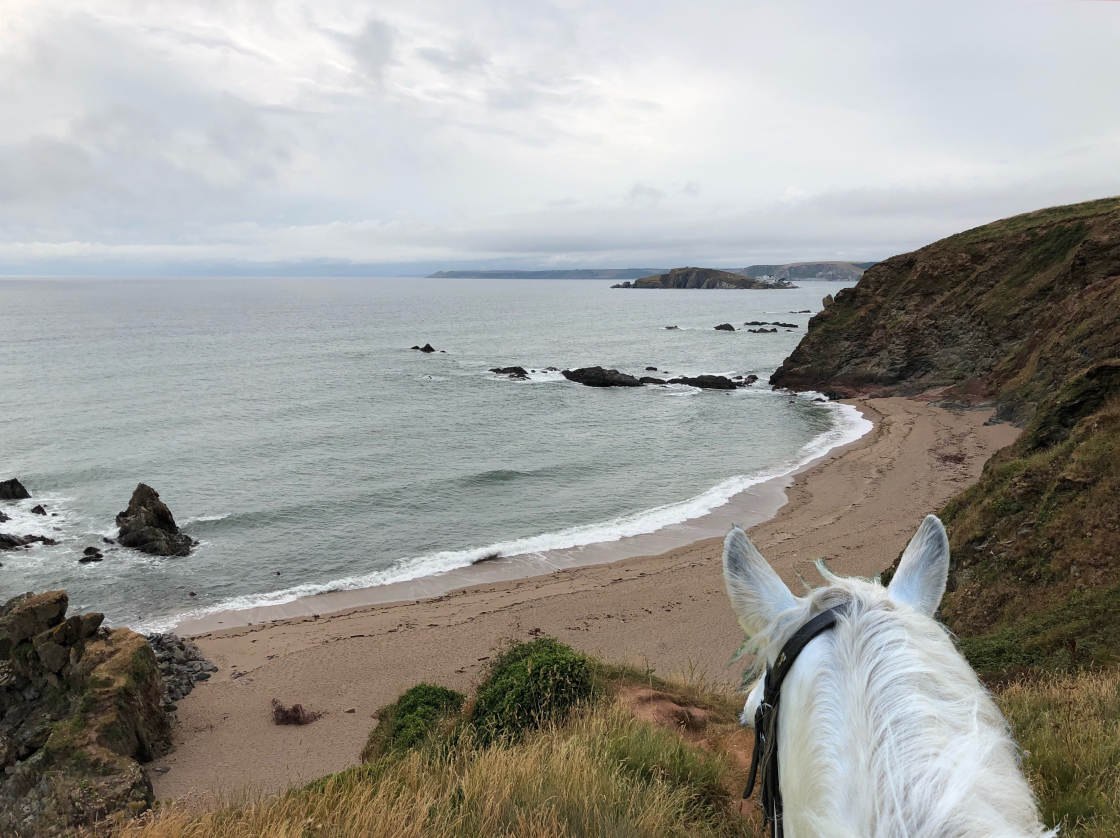
Below is the final blended image that I created. The horse was cut out of the bluebell wood, and given a new coastal view as the background.
Here's another picture where the horse has been moved to a foggy wood. Saving the horse cutout to the mask library allowed me to easily add it to lots of different background photos.

Of course, you're not limited to combining two photos. If you want to add another image or mask to your project, open theLayertab, and tapAdd Layer. TapPhoto Layer, then select the image or mask you want to add. You can repeat this to add even more images to your project.
3.4 Add A Shadow
When you add a cutout subject onto a new background photo, sometimes it can look a bit flat. The Shadow tool can help the final image look more realistic and three-dimensional.
To add a shadow to the top layer of your image, tap theLayerstab, then tapCast Shadow. A shadow will appear around the subject. Use the Opacityslider to make the shadow lighter or darker.
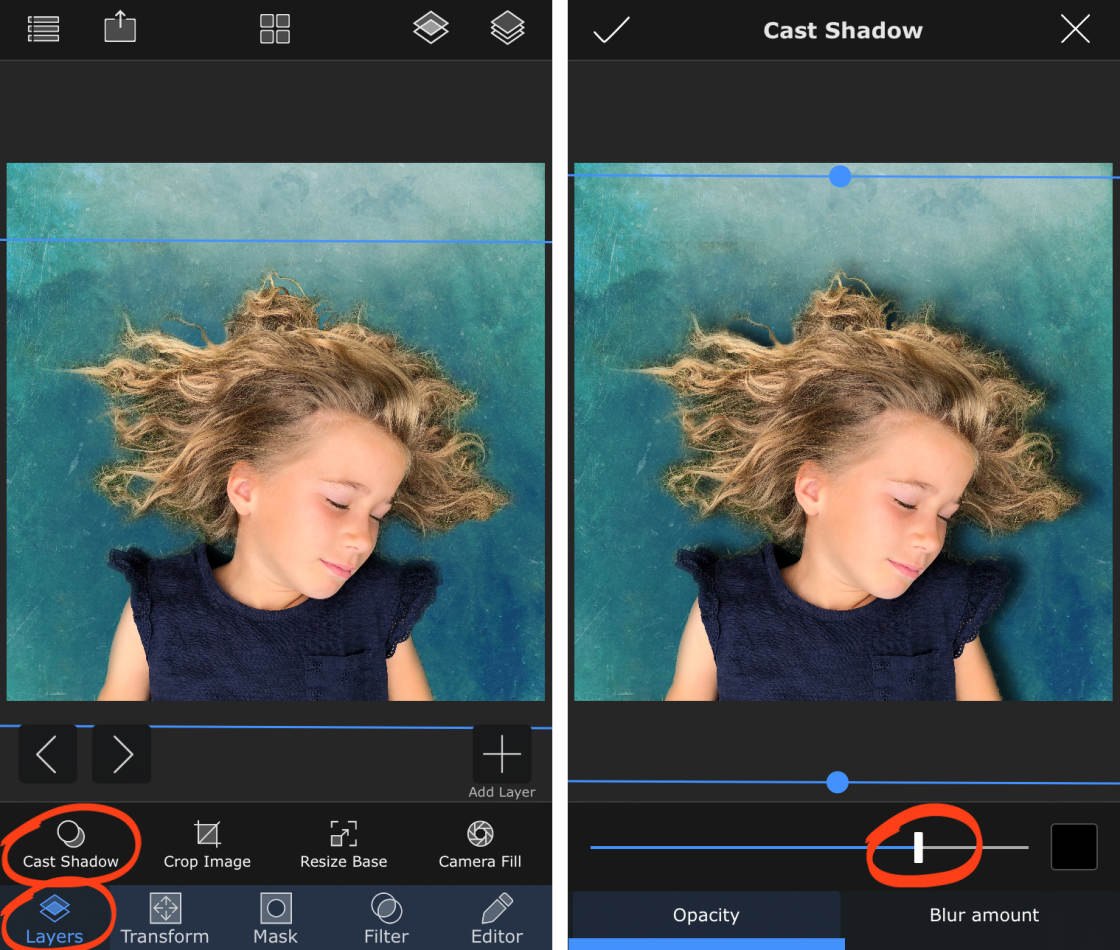
To adjust the softness of the shadow edges, tap Blur Amount at the bottom of the screen, then adjust the slider. To the right of the sliders, you can select a color for your shadow. Use a black shadow for a realistic finish.
Finally, you can move the position of the shadow by dragging your finger across the screen.
4. Save Your Blended Image
When you've finished blending your images, don't forget to save your creation to your iPhone's photo library.
Tap the Share icon (rectangle with arrow) at the top of the screen. Select Blended Image, then tap Save.
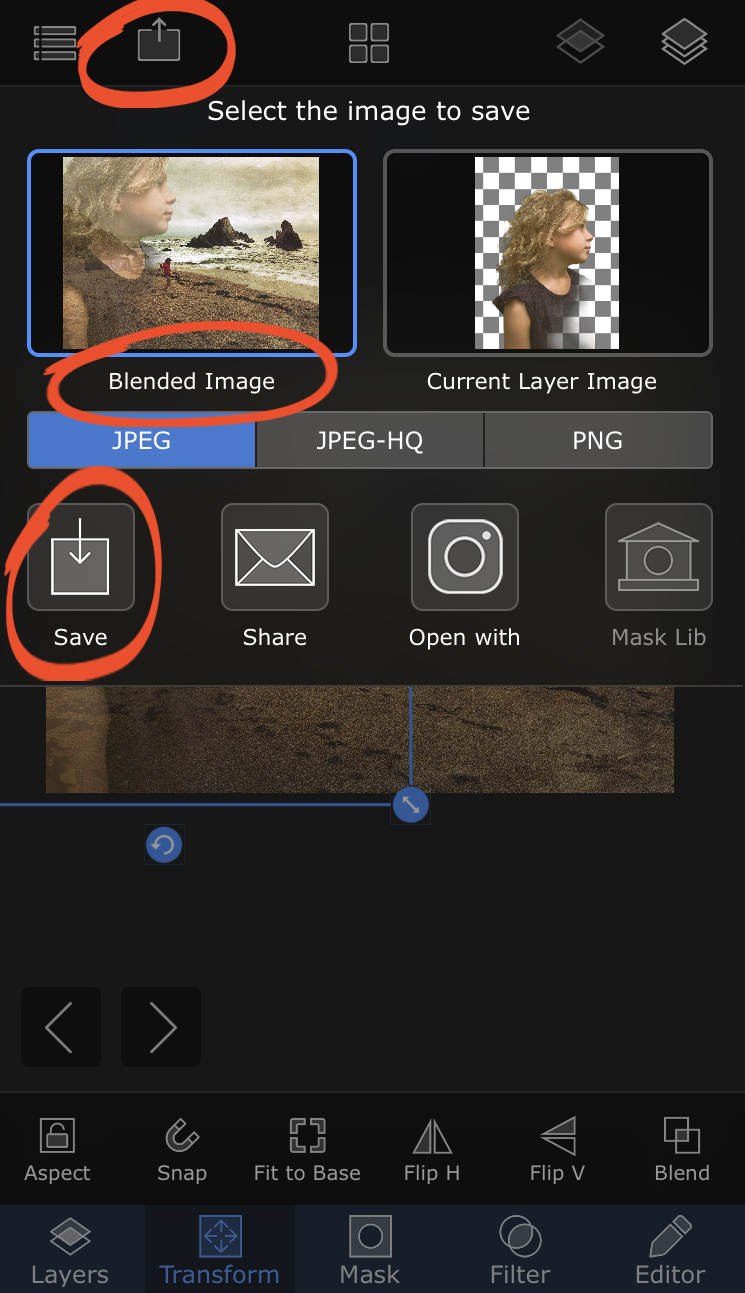
The image will be saved to the built-in Photos app on your iPhone.
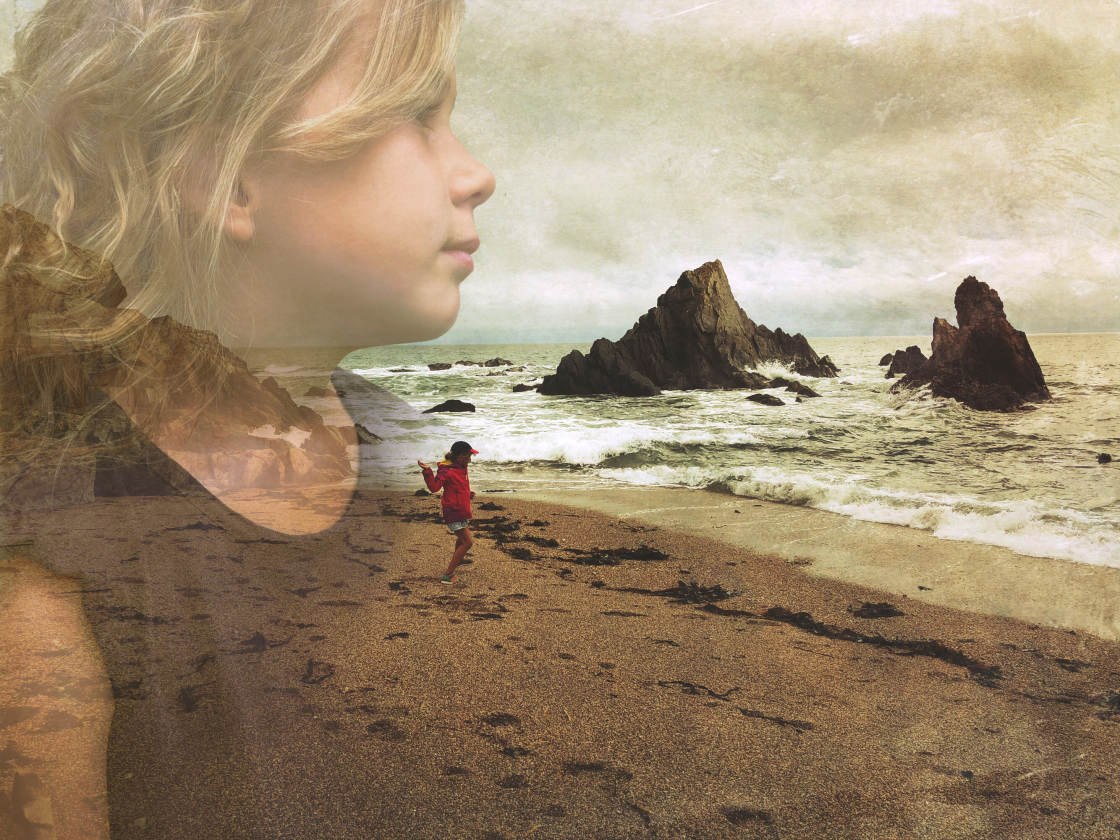
5. Create A Double-Exposure Image
Double-exposure is a creative technique that blends two images together in an artistic way.
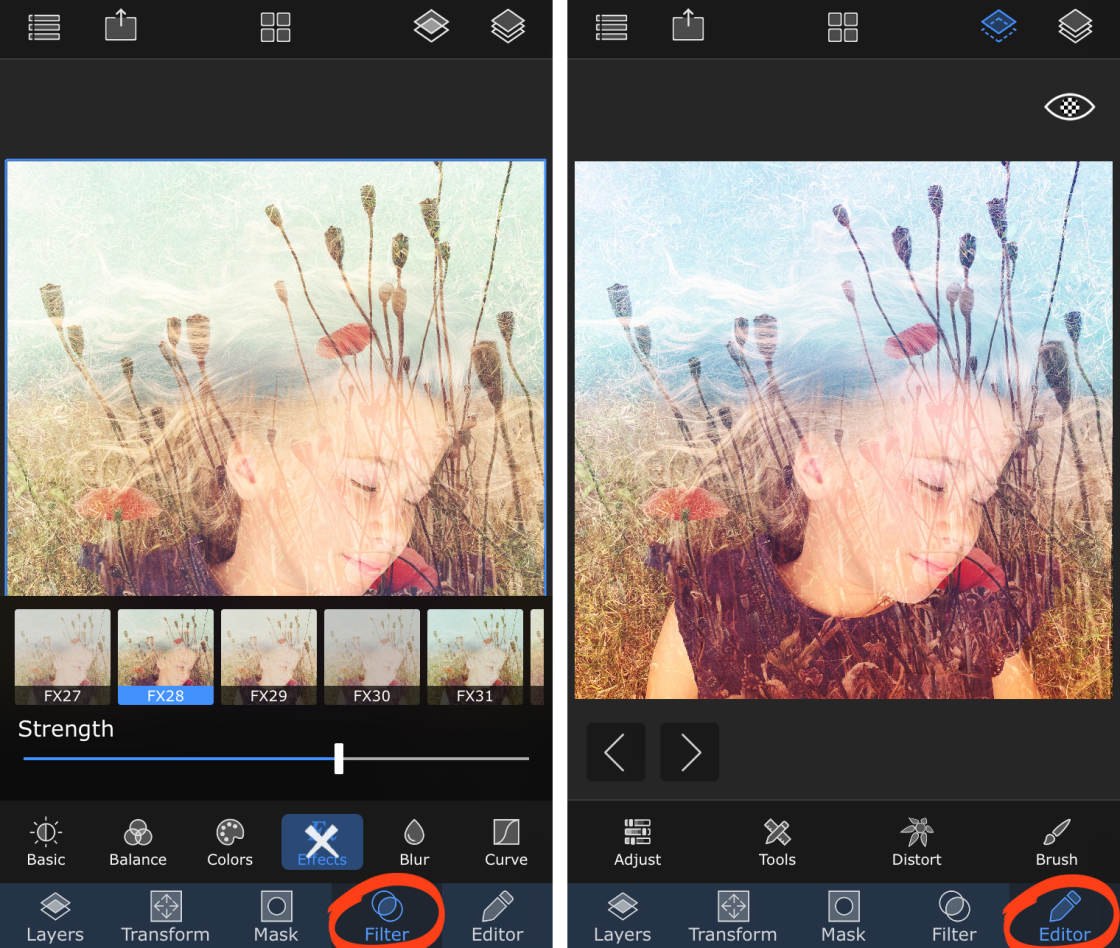
I created this double-exposure photo from two images: a wheat field and a portrait of a girl.
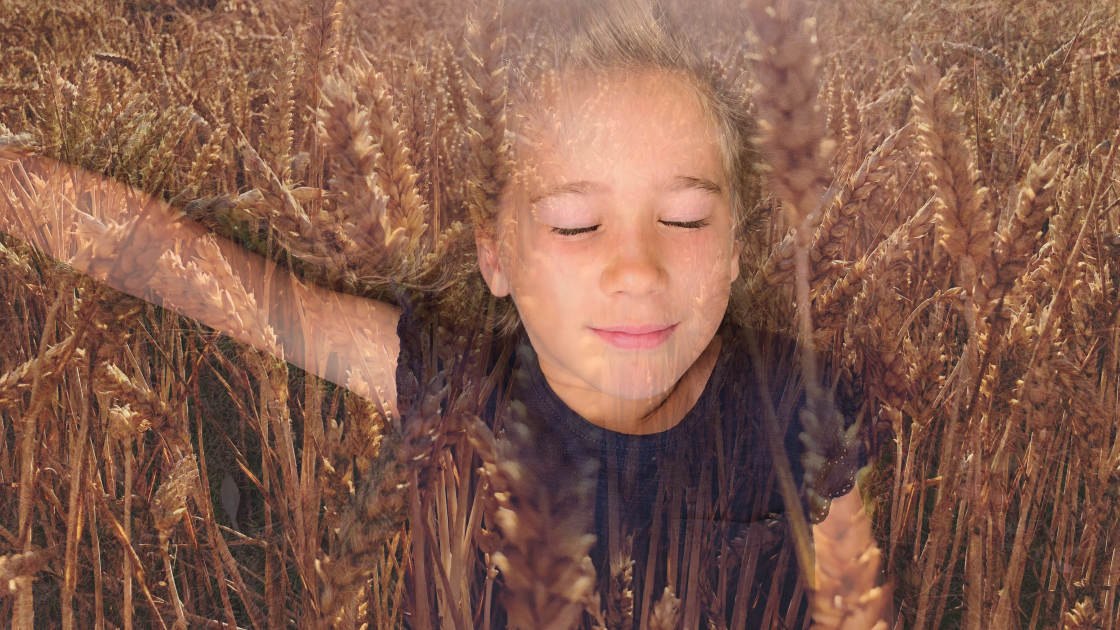
Creating a double-exposure image in the Superimpose app involves using layers, masks and blending modes. Read on to learn how to use Superimpose to create your own amazing double-exposures.
5.1 Open Your Two Images
Start by deciding which two photos you want to combine. Double-exposures can add a new dimension to the story-telling ability of your images. So think carefully about what you want to achieve, and choose two photos that will work well together.
Open the first image from your photo library. If you're currently in the Superimpose editing screen, tap the Library icon (four squares). EnsurePhotosis active, then select the photo you want to use. Crop the image if you wish, then tapChoose.
To add your second photo, ensure the Layers tab is active at the bottom of the screen. TapAdd Layer, then tapPhoto Layer.
Open the second image from your photo library or mask library. Remember, the mask library contains images that you've already cut out and saved for future use. In the example below, I chose a photo of a girl that I'd already cut out and saved to my mask library.
When you open the second photo, it appears on top of the background image. Move or resize the top layer using the Transform option at the bottom of the screen.
5.2 Blend The Layers
Now you can blend the two images to create a double-exposure effect. Ensure the Transformtab is active, then tapBlend.
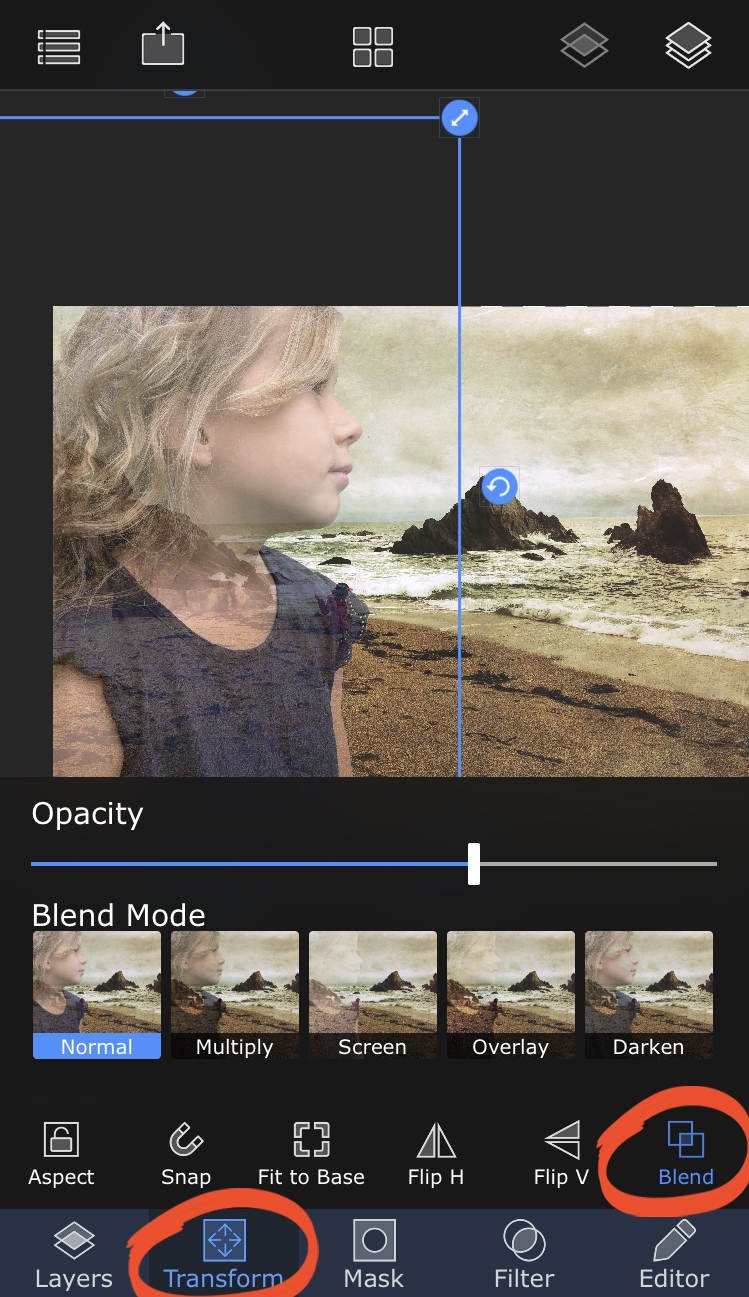
Scroll across to see the 17 different blend modes. Tap each blend mode to see how they blend the layers together in different ways. Use theOpacityslider to adjust the transparency of the top layer until you're happy with the result.
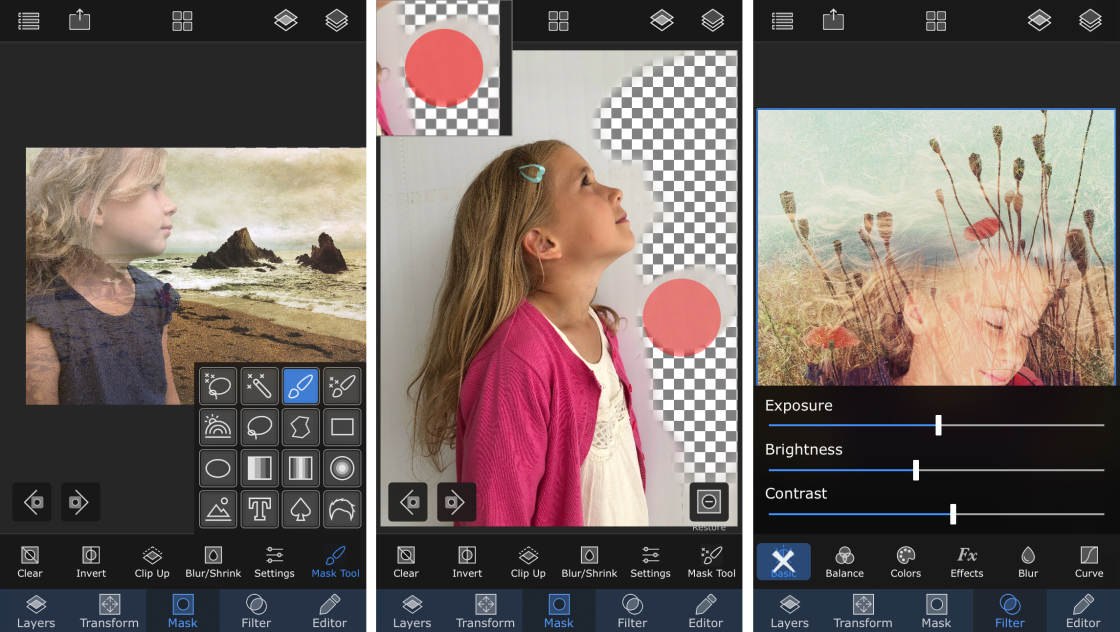
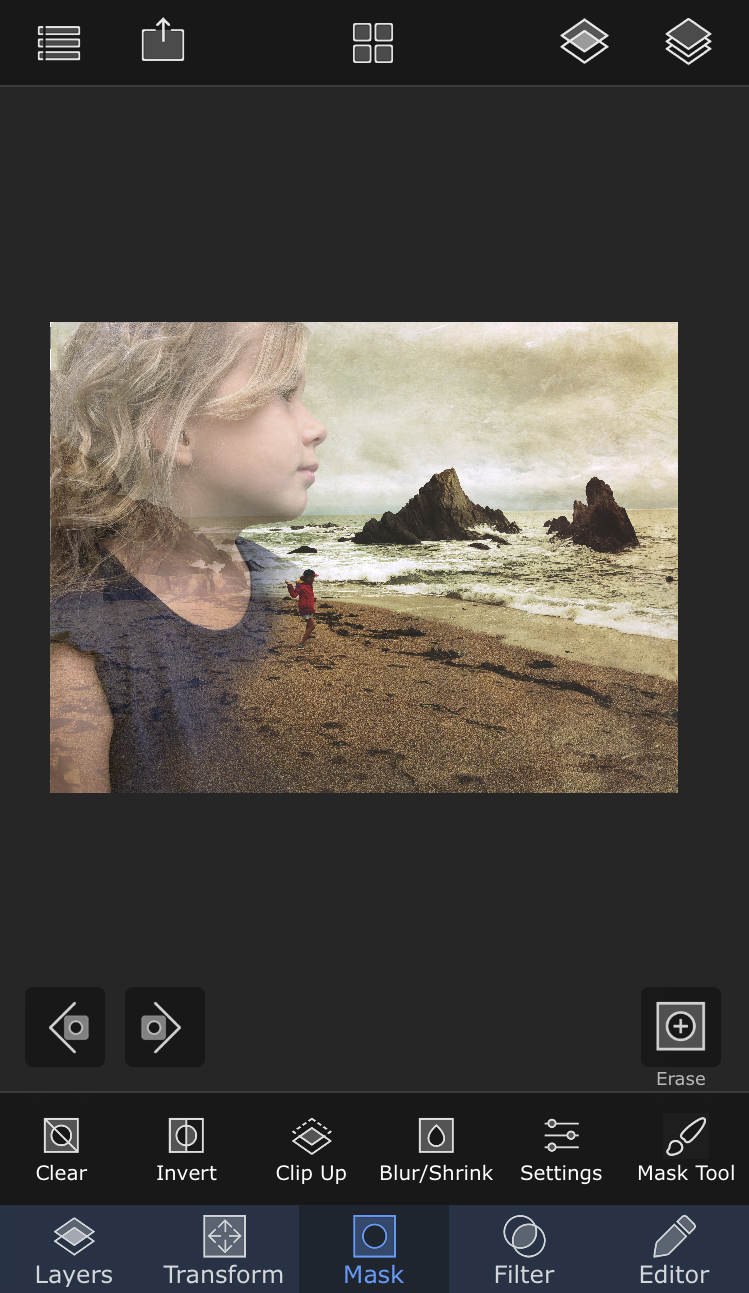
5.3 Use Mask Tools To Erase
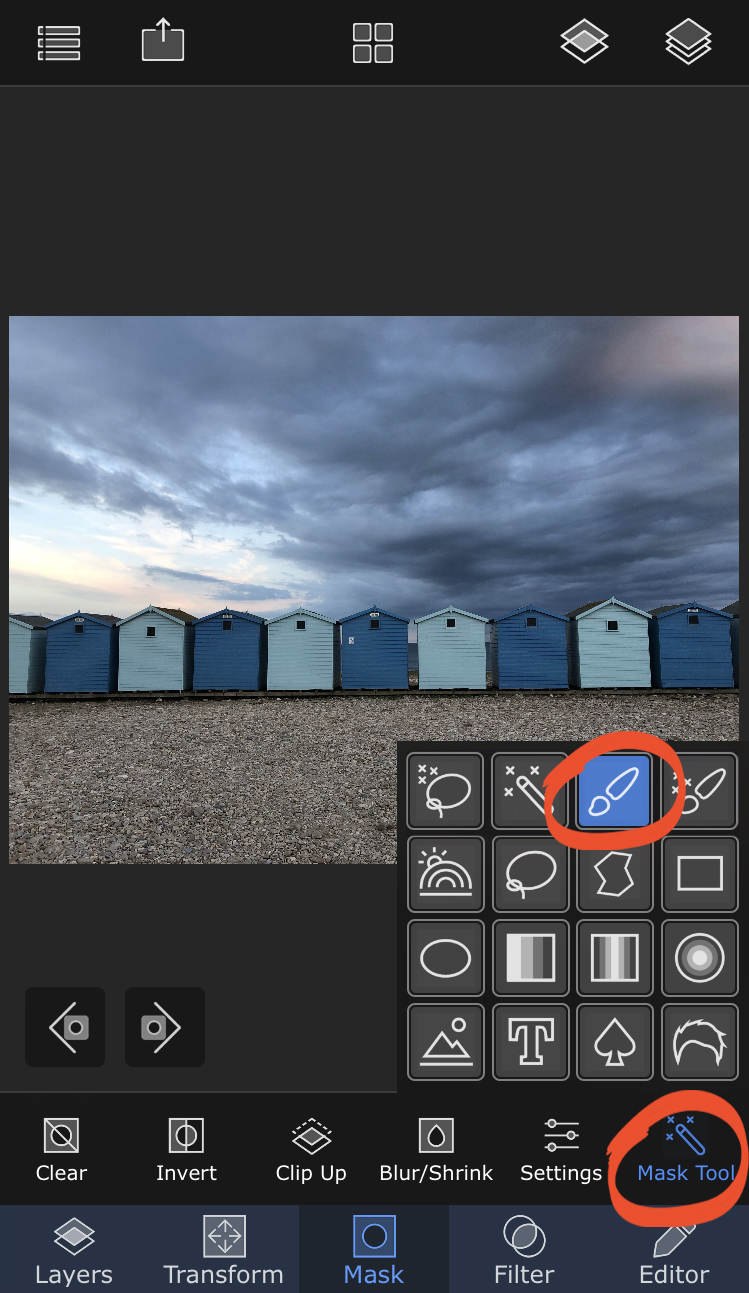
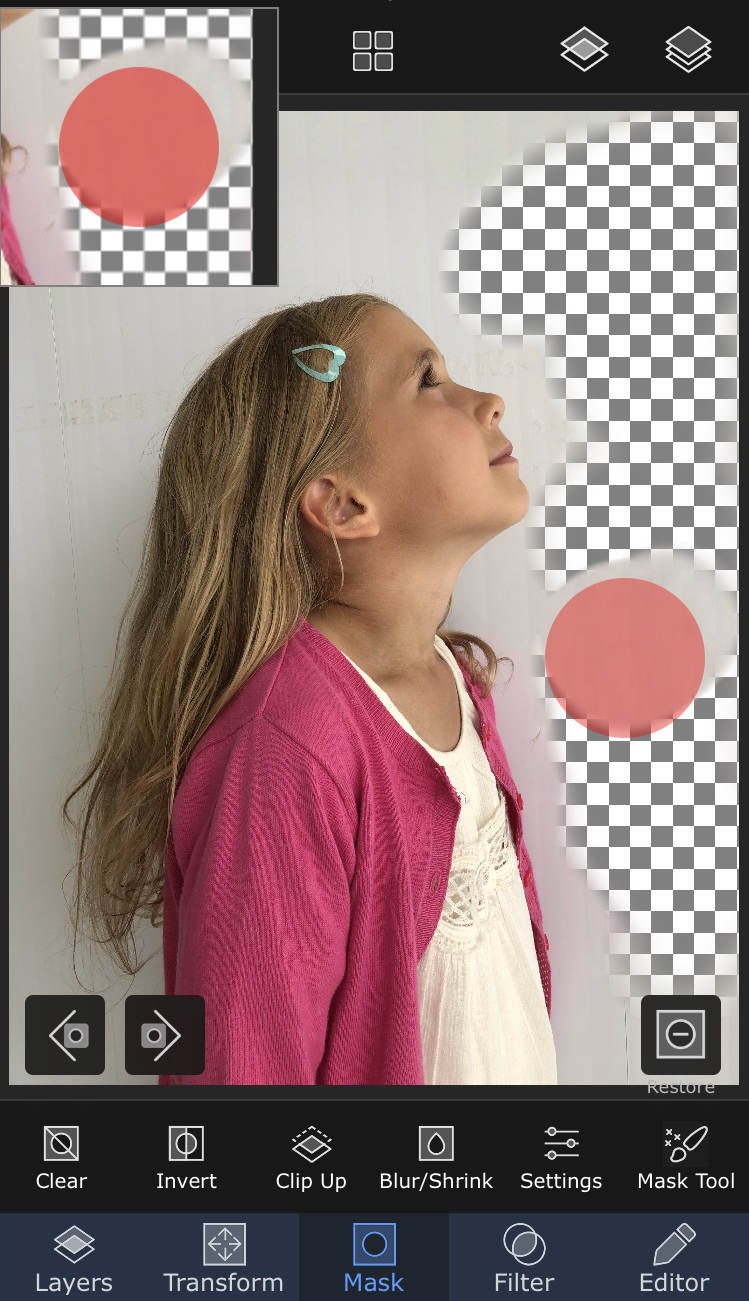
If necessary, you can use the mask tools to erase parts of the top image. This can help the two images to blend more smoothly. Tap the Mask tab at the bottom of the screen, then tap Mask Tool. Select the Brush mask tool from the pop-up box.
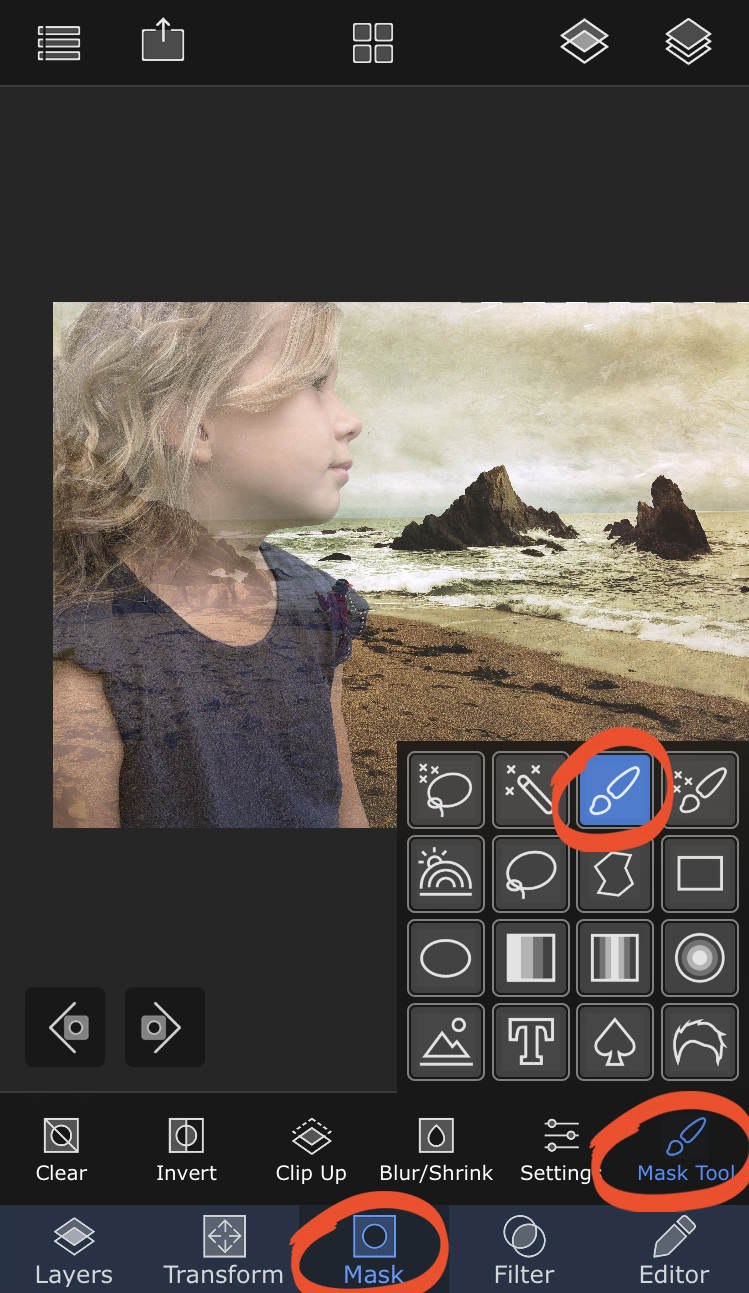
TapSettingsbeneath the photo, and select theFeathered Brush. Adjust the Brush Size to suit the size of the area you want to erase.

Use your finger to brush over parts of the top layer that you want to erase. This will reveal more of the background image in these areas. In the example below, I erased part of the girl's shoulder on the top layer. This revealed the girl standing on the beach in the bottom layer.
5.4 Match The Colors Of Your Images
The Match Color tool improves the blending process by matching the colors of both images.
Ensure the Layers tab is active at the bottom left of the screen. Then tap theLayers icon (three stacked squares) at the top right.
In the layers palette on the right, tap the layer you want to change the color of, e.g. the top layer. Select Match Color from the menu that appears.
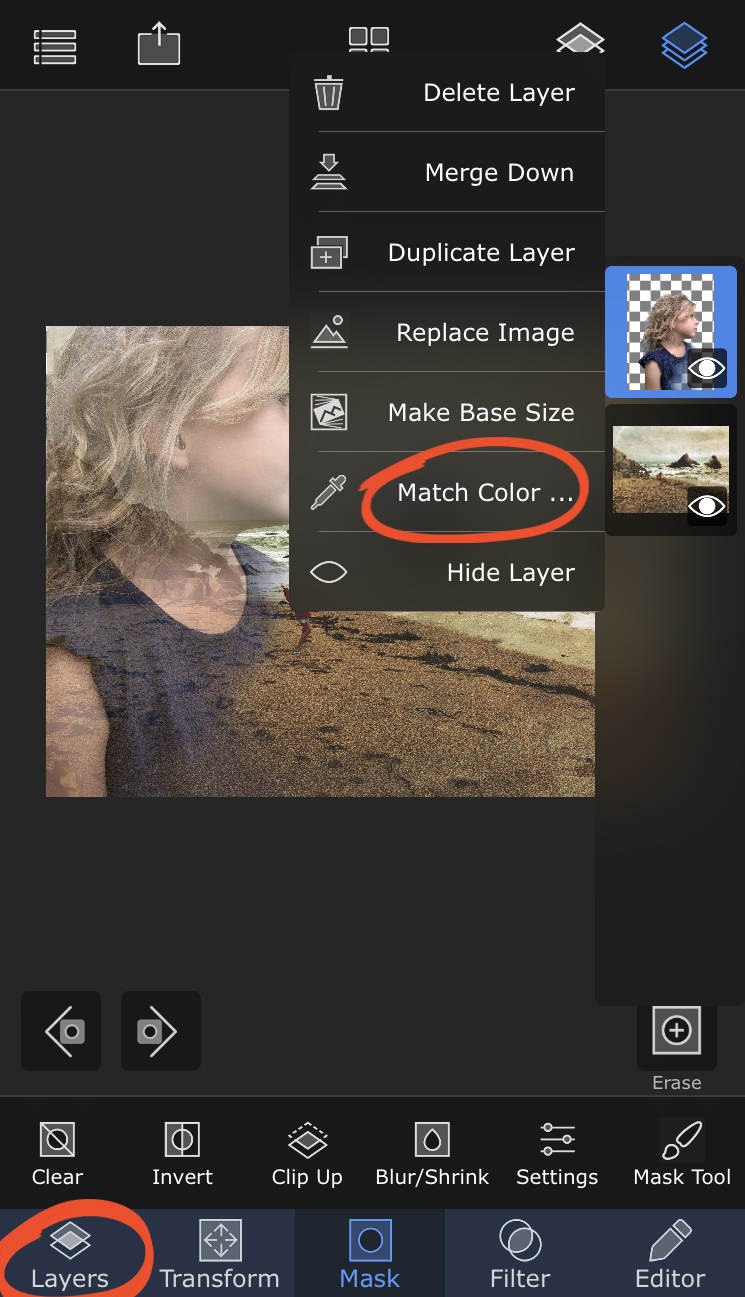
A message will appear asking what you want to match the color to. Tap on the other layer, e.g. the bottom layer, to harmonize the color in the two images.
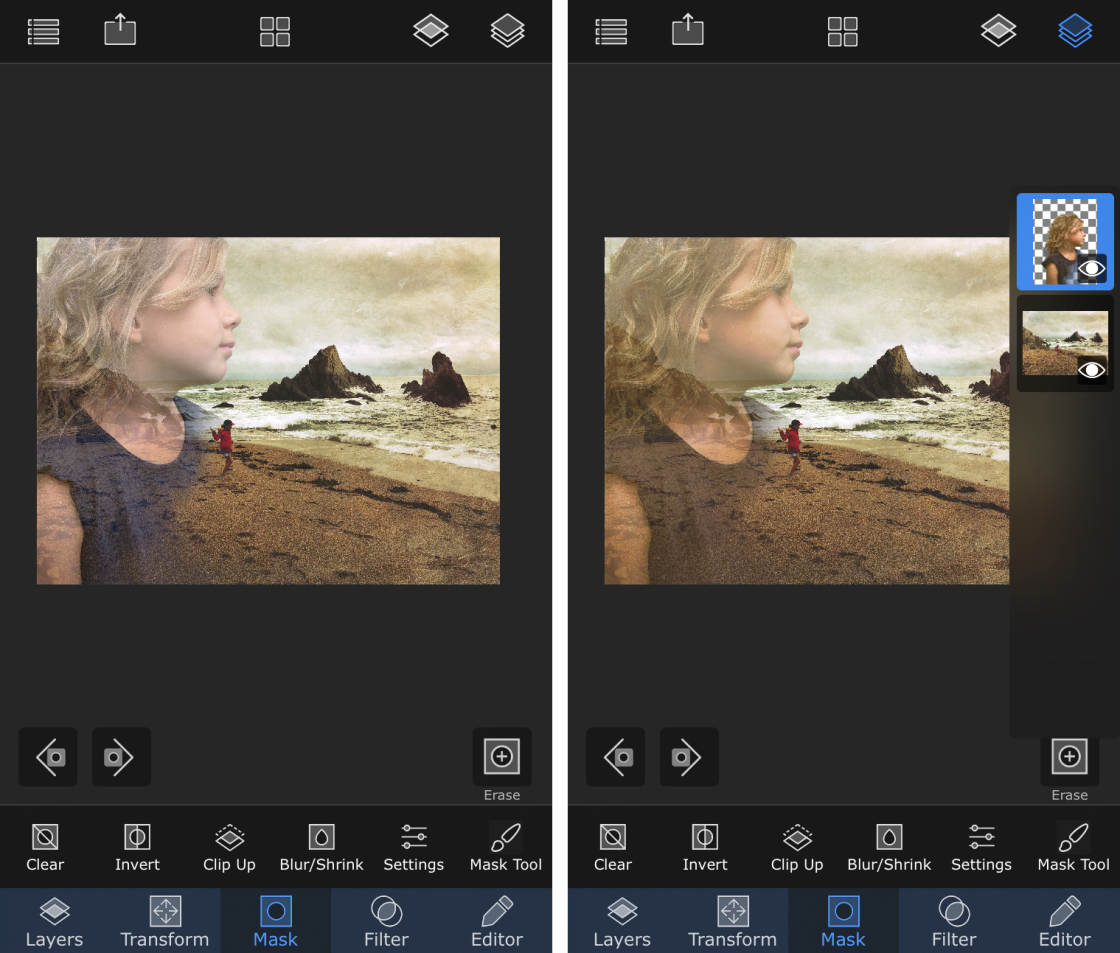
The screenshots below show how the color of the top layer (the large image of the girl) has changed. The colors appear warmer (more orange) to match the warm color tone of the beach photo.
When you're happy with your double-exposure image, remember to save it. Tap the Shareicon (rectangle with arrow) at the top of the screen. SelectBlended Image, then tap Save.
The double-exposure image will save to the built-in Photos app on your iPhone.
In addition to masks and layers, Superimpose X has a wide range of iPhone filters and editing tools. You can use these to enhance your image and add some finishing touches to your creation.
6.1 Open The Filter & Editor Tools
Tap on the Filter and Editor tabs at the bottom of the screen to see the available tools.
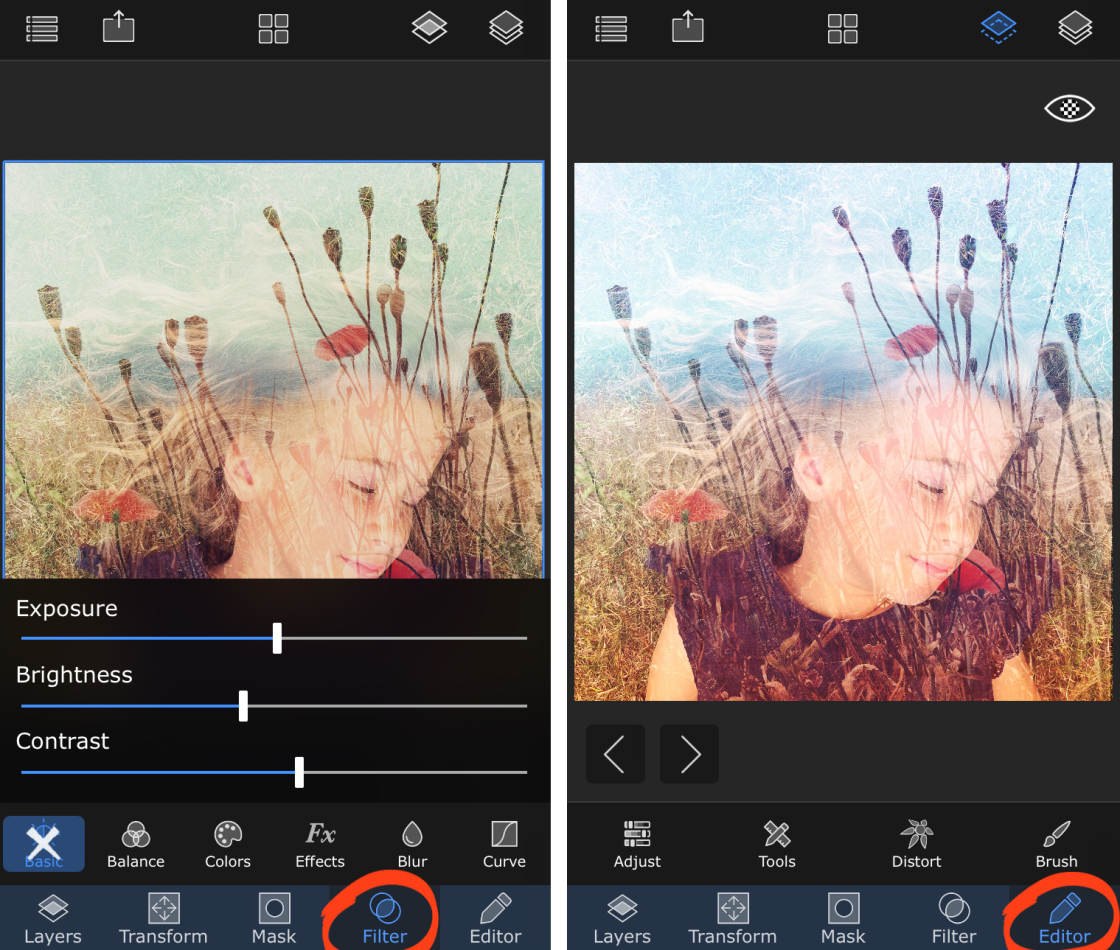
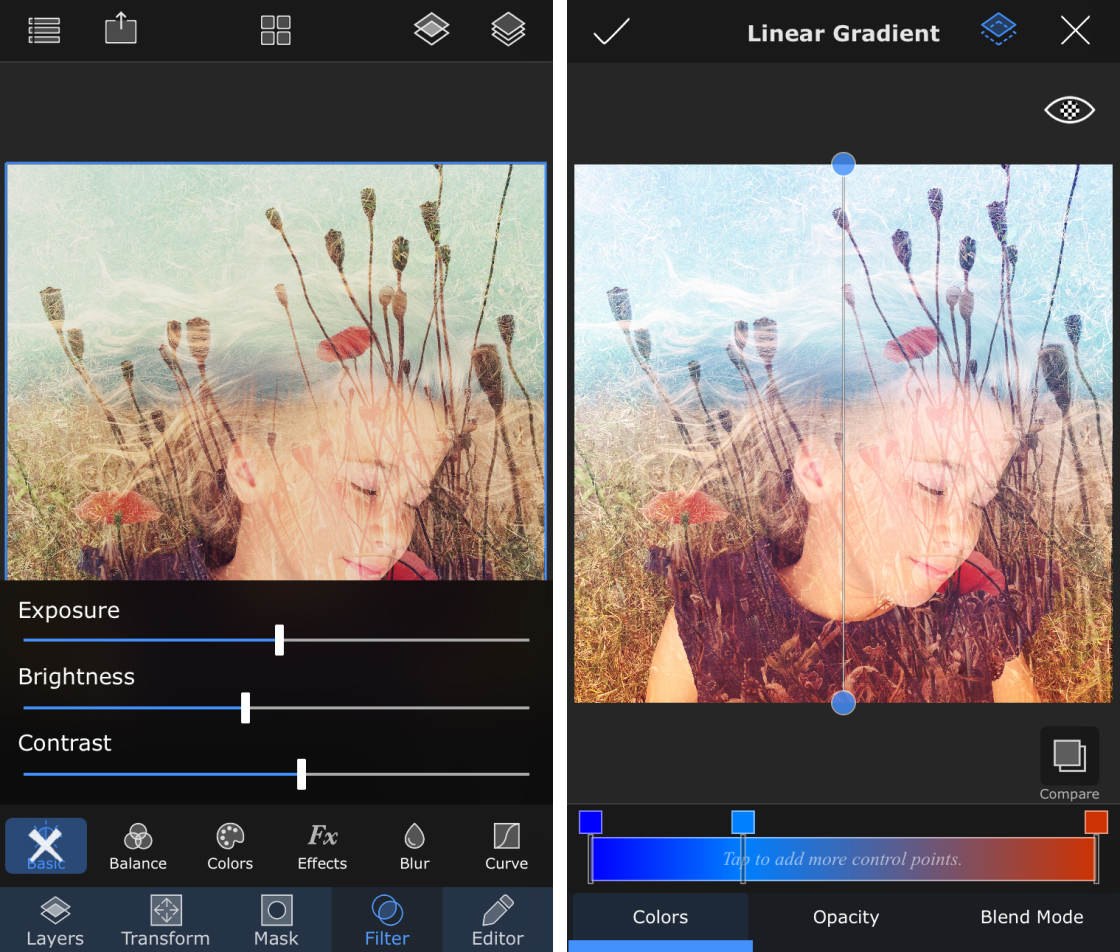
There are one-tap filter effects, as well as color, exposure and clarity tools. You can blur and distort your photos, add gradients and vignettes, and type onto your images.
There's also a selection of brush tools. These let you paint, smudge or add preset overlays to your photos.
6.2 Use The Brush To Paint Overlays Onto Your Image
The Brush tool in the Editor tab has a selection of overlays that you can "paint" onto your image. Use it to add birds, trees, hearts, stars, and more to your creation.
Open theEditor tab at the bottom of the screen, then tapBrush. SelectEffect, then swipe across the row of preset brush shapes and tap the one you want to use.
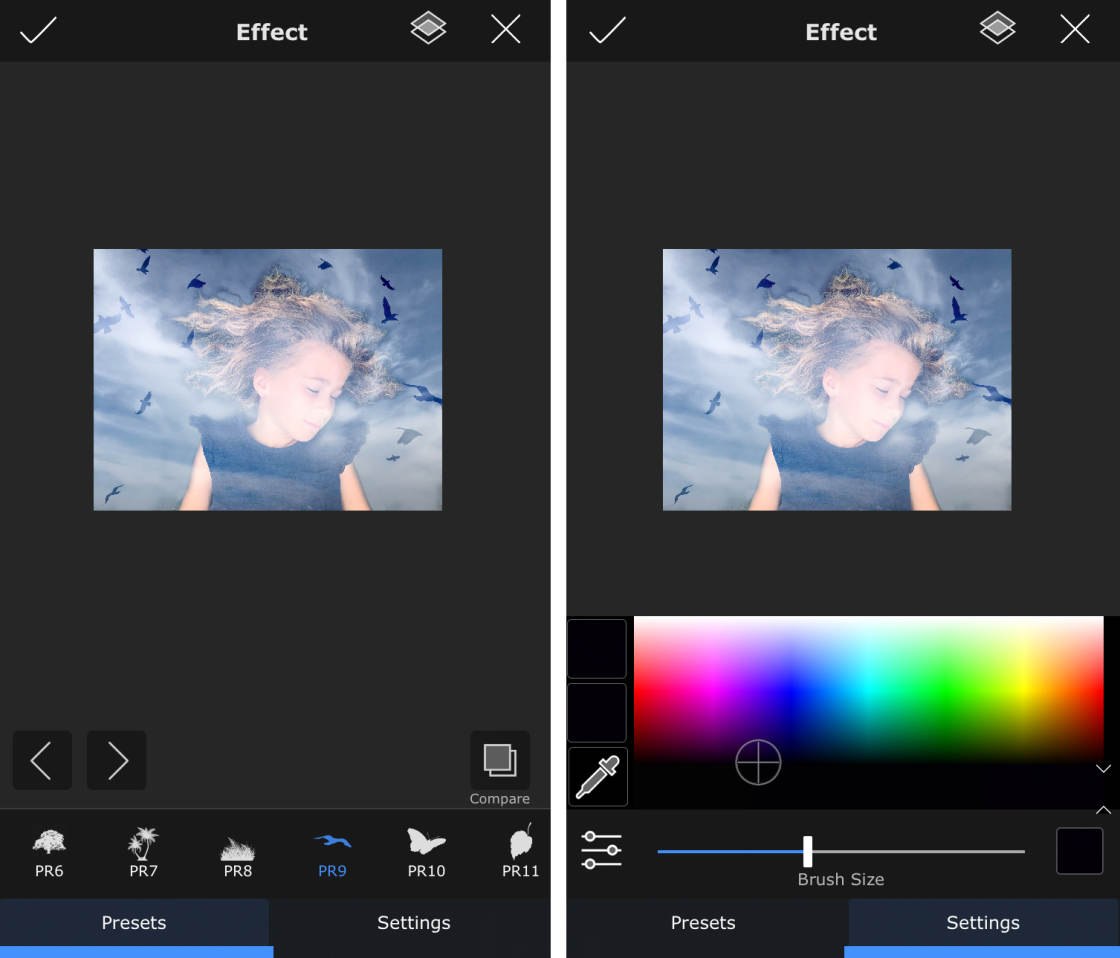
Tap Settings at the bottom of the screen to adjust the size and color of the overlay. You can access more settings by tapping the icon with three sliders to the left of the Brush Size slider.
Use your finger to add the overlay to your image. Tap once on the screen to add a single overlay. Or drag your finger to scatter the overlay across a large area. Tap the checkmark at the top left to apply the overlay to your image.
7. Manage Your Stored Sessions & Masks
Each time you start a new project in Superimpose, the previous project automatically saves into the Sessions library.
To go back to a previous project, tap the Libraryicon (four squares) at the top of the editor screen. Tap Sessions, then tap on the project you want to open.
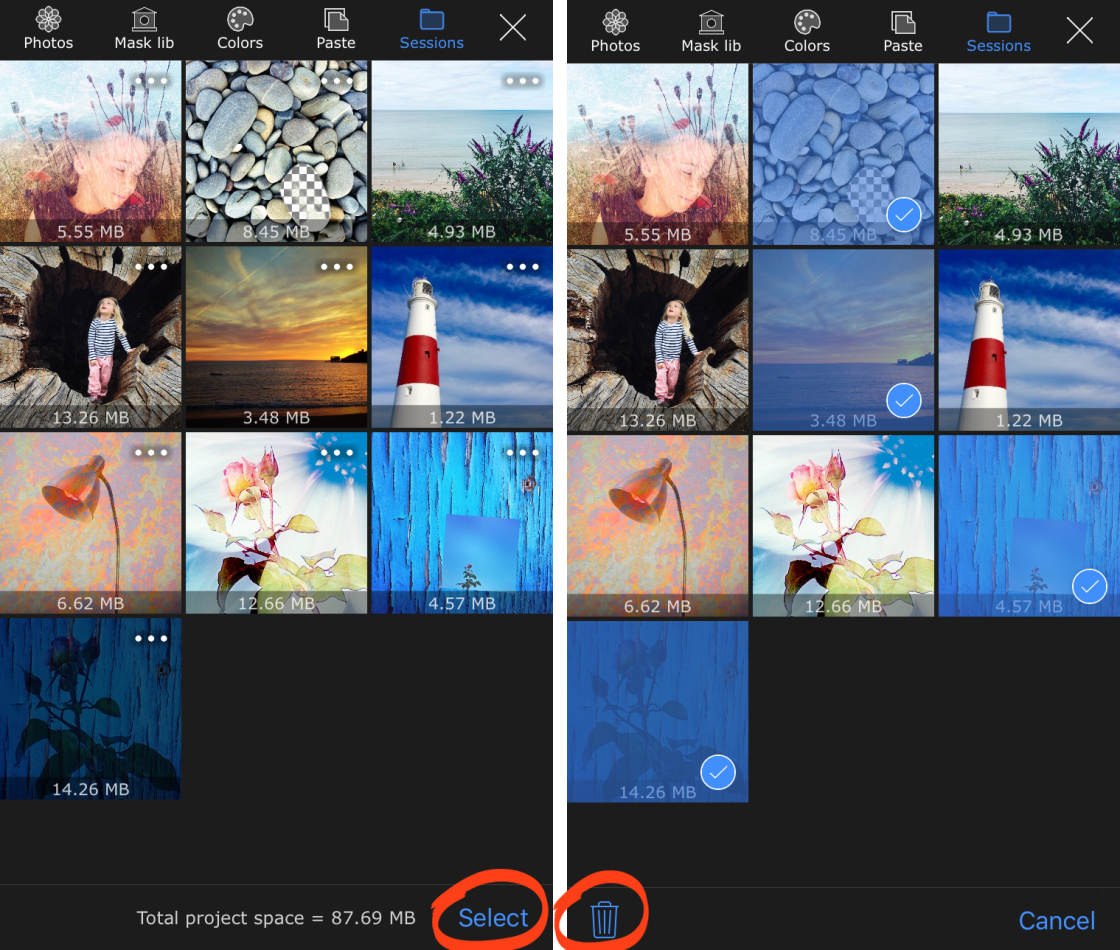
In the Sessions library, you'll see the amount of storage space used by each project. The total amount of project storage space appears at the bottom of the screen.
To ensure you don't fill up your iPhone's storage capacity, delete any projects that you no longer want.
To delete projects from the Sessions library, tapSelect at the bottom of the screen. Select the projects you want to delete, then tap theDelete icon at the bottom left.
You can manage your mask library in the same way. Tap Mask Libat the top of the screen, then tapSelect. Tap the masks you want to delete, then tap theDelete icon.
Are you looking to discover other apps that will help you produce stunning edits? Check out our article on the best photoshop apps for iPhone!
How To Superimpose Pictures On Iphone Free
Source: https://iphonephotographyschool.com/superimpose-app/
Posted by: doylecriall97.blogspot.com
0 Response to "How To Superimpose Pictures On Iphone Free"
Post a Comment